For King And Empire – Thomas Edward Jones Of The Durham Light Infantry

When the Britain braced for war in the months leading up to August of 1914, many a lad would take into serious consideration – which branch of the service he would enlist if England was to be drawn into a European conflict.

However, many Britons were already serving in the armed forces; well before their country declared war against German on the 4th of August.  One such soldier was Private Thomas Edward JONES of the Durham Light Infantry.  Born in the town of ‘Bishop Aukland’ in the County of Durham on the 14th of December, 1889 – it was inevitable that Thomas would serve with the unit which became synonymous with his County of birth.

IMAGE RIGHT:  For King And Empire – Services Rendered.  This badge was presented to Sergeant Bugler Thomas Edward JONES of the Durham Light Infantry as a result of his service in His Magesty’s Armed Forces.  Whilst the war medals originally issued to Thomas are missing from the family, they have both the original ’King & Empire’ badge and the certificate that came with it. 

Thomas enlisted with the rank of Private into the 2nd Battalion of the Durham Light Infantry on the 12th of February, 1907 at the youthful age of 18 years and 2 months.    His great nephew, Jason Renshaw who resides in Australia was informed that Thomas had spent some time on garrison duty in Cork, Ireland prior to the First World War.  This period may amount to a portion of the “3 year period of overseas service” recorded on his original parchment enrolement papers.   

According to the original documents held by the descedants of Thomas Edward JONES, it is evident that he transferred from the 16th (2nd Reserve) Battalion to Class “V” Army Reserve on the 26th of July 1916 after serving with the colours for 1 year and 11 months.  The transfer to Army Reserve being completed on the 31st May 1917 at Colchester.

IMAGE LEFT:  Sergeant Thomas Edward JONES with his wife Sarah Jane (OUGHTON).  Sarah was born on the 18th of March, 1891 in Sacriston in County Durham and married Thomas Edward JONES on the 17th of December, 1909.

Thomas married Sarah Jane OUGHTON in England where they raised a family.  However, when most of her children emmigrated to Australia,  it has been said this affected Sarah greatly and that she died of a “broken heart” on the 23rd of May, 1959.  Upon losing his wife, Thomas then came out to Australia to be with his children.  It can safely be assumed that as Thomas brought with him; all of his Army documents and War badge …. then he would certainly have brought his war service medals with him as well.   It is a regular occurrence – that First World War medals awarded to Britons during the Great War; would be re-located to Australia or other parts of the globe as a result of emmigration.

The late Harrison Oughton JONES was the third born son of Thomas.  Harrison who also served with the Durham Light Infantry in the 1st Battalion, saw active service in China, North Africa, Palestine, Malta, Kos, France, Belgium and Germany during World War 2.  Jason RENSHAW is the grandson of Harrison and great-grandson to Thomas Edward JONES. Jason indicates that before Harrison passed away, he gave three miniature World War 1 medals to Maurice Jones (the last remaining son of Thomas Edward).   The message passed on with this miniature First World War trio was that the medals in fact, belonged to Thomas.   Naturally, these miniatures consist of the 1914-1915 Star, the British War Medal and the Victory Medal.   However, no mention was made as to the location of the ‘full size’ missing war medals and it is hoped that these awards are out in the collector world; hopefully to be re-united with the descendants of Thomas Edward JONES.  Can you help?

IMAGE RIGHT:  The incomplete medal card of Thomas Edward JONES. Whilst the card does not specify which medals have been awarded to Thomas, it does in fact record his rank as being “Bugler Sergeant” and his attachment to the 6th Battalion of the Durham Light Infantry.

Some confusion was experienced by the descendants of Thomas as his original medal card shows no medals at all were awarded.  However, like many other service records that were kept on hand by the British authorities, it appears that the service records of Thomas Edward JONES were destroyed by fire during World War 2.

Searching for a missing war medal set belonging to a common surname, such as “Smith” or “Jones” can be like searching for the veritable ‘needle’ in a pile of needles.   However, with the ever increasing trade in war medals on ebay and other such auction sites taking place – there is always hope that the medals will eventually turn up on the open market.  

And Medals Gone Missing asks that all of you collectors out there, consider the possibility that one day …… a descendant of a serviceman or woman, which you hold in your collection – may seek for a return of the medals.  It will only be through your act of extreme kindness; that will make this possible.

IMAGE LEFT:  An image of the First World War trio, consisting of the 1914-1915 Star, British War Medal and Victory Medal; similar to what was awarded to Sergeant Thomas Edward JONES for service during the Great War.
THESE WAR MEDALS ARE MISSING !  CAN YOU HELP ?

  • Delicious
  • Facebook
  • Digg
  • Reddit
  • StumbleUpon
  • Twitter
Posted in Honour Roll - British Stories, Military Medals | Tagged | Leave a comment

Do You Know George Green of 16 Hope Street, Southport – England Who Lived here During World War One?

Do you know George GREEN who lived at 16 Hope Street, Southport in England during World War One?  If so, we are seeking to make contact with him or one of his descendants.

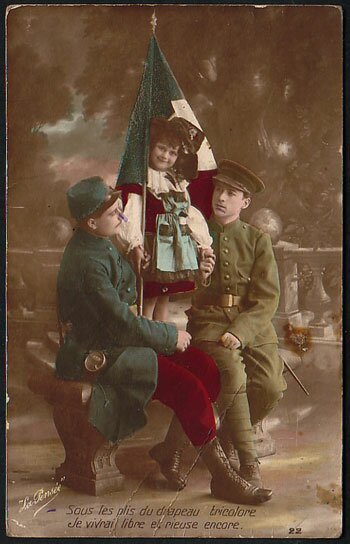
Medals Gone Missing have recently purchased a First World War postcard from ebay. The card was sent by a British soldier to his son, ‘Master George Green’ sometime during the Great War.  The card itself is a wonderful photographic print, which depicts two Allies – a French soldier and a British soldier, protectively flanking a young girl who is holding the French flag.   Whilst the image is essentially a sepia print photograph, the original of the image has been ‘hand painted’ and shows the French soldier adorned in his traditional red coloured breeches with grey/blue tunic.  The English soldier of course, is wearing his khaki coloured woollen tunic and trousers, complete with a visored cap and puttees.

IMAGE RIGHT:  The postcard, showing a French soldier and a British soldier, seated alongside the young French girl.  Patriotic images such as this, simply reinforced that the British and the French ….. once sworn enemies from the Napoleonic era ….. were now united Allies; fighting a common foe.  Note the ‘graffitti’, presumably done by a young George Green. 

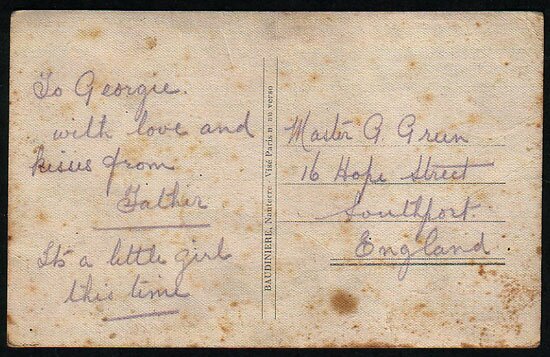
The reverse side of the postcard shows the handwriting of the author; the father of young George GREEN. This soldier has obviously written the postcard whilst away from home; possibly whilst on deployment in France as you would expect from the subject matter.  The card is addressed to Master G. GREEN of 16 Hope Street, Southport in England.  The script on the card states:- to Georgie with love and kisses from Father.  It’s a little girl this time.   One can only assume from this last comment, that his father had previously sent a postcard with the image of a young French boy?

As little boys do, some pen marks or ‘graffitti’ have been applied to the front of the card; namely on the nose of the French soldier and the chin of the British soldier.  Perhaps young George was scolded by his mother for defacing the images like this.  I would love to be able to locate George and ask him !!

IMAGE LEFT:  The handwriting of a loving father, to his son George Green of Southport – England.  If you are a descendant of George Green who lived at 16 Hope Street, then Medals Gone Missing would dearly love to hear from you.  There is no greater sense of satisfaction than returning such items of militaria to it’s rightful family.

If Master George GREEN is still alive, he would be a very ripe old age indeed.  The Medals Gone Missing Administrator is seeking any descendant of “young” George with the view of returning this piece of Great War history to it’s rightful owner.

Whilst the postcard was purchased for a very small price – the princely sum of $5 AUD …… small tokens of a father’s love, such as this - are priceless !   And the Medals Gone Missing Administrator would like to remind our readers that it is not simply missing war medals; that are the focus of our ‘non profit’ organisation.  We are constantly purchasing small items such as this, in the hope that one day – they will be returned to their respective family.

I sincerely hope that the father of George Green survived the war, to see his young son grow up.  Without a first name, or even an initial …… it is near impossible to find out the fate of George’s father.  A search of the Commonwealth War Graves Commission records indicate that thousands of men by the surname of GREEN, tragically lost their life during the First World War. 

The sad fact is, it is highly possible that George grew up to fight his own war from 1939 through to 1945.

FOOTNOTE: If one of our FRENCH readers could kindly translate the inscription on the bottom of the card, we would appreciate it.

RESULT: My thanks to one of our readers, Rick Christopher who provided the translation:- “I will live free and happy again under folds of the triclour flag”.

  • Delicious
  • Facebook
  • Digg
  • Reddit
  • StumbleUpon
  • Twitter
Posted in Honour Roll - British Stories, Military Medals | Tagged | 2 Comments

Lieutenant Baillie Chisholm Munro, Military Cross, The Kings Royal Rifle Corps at the Nieuport Beach Party

Baillie Chisholm MUNRO came from humble beginnings.  He was the grandson of carpenter William MUNRO and Margaret CHISHOLM, who moved to Bettyhill, Sutherland in Scotland shortly after marrying at Kilmuir-Easter, Ross and Cromarty in 1830. William was innkeeper at Bettyhill where he and Margaret had four children, with son William following in his father’s footsteps as the local innkeeper. He married Annie Gordon MacLeod, and they had six children including Baillie Chisholm MUNRO who was born at Bettyhill about 1884.

Baillie and his brother Donald MacLeod MUNRO emigrated to Rhodesia, and another brother John, emigrated to Canada, becoming a barrister at Saskatoon prior to the outbreak of war. Donald MacLeod Munro died on the battlefields of Southern Rhodesia on 14th November 1910, but it is not known if Baillie was involved in that conflict. Baillie travelled on the ‘Norman” from Durban to London, arriving on 4 November 1914, three months after Britain declared war on Germany. He travelled as 30 year old engineer Baillie C Munro, whose country of last permanent residence was Rhodesia, and country of intended future residence was Scotland. He enlisted with the Kings Royal Rifle Corps at London on 18th November 1914 with the rank of Private, and after just one month of training boarded a troopship to France on 21 December 1914.

IMAGE LEFT: Hat badge of The Kings Royal Rifle Corps.  Enlisting and embarking for active service in 1914, Baillie was one of the original Battalion members who would answer the call for Britain.  As can be seen by the inscriptions emblazoned on their hat badge, the K.R.R.C. already had a very proud and distinguished battle record.

According to one report Baillie was wounded in action during March of 1915, but his injuries couldn’t have been too serious as the “Supplement to the London Gazette” dated 27 July 1916 awards him the Military Cross, and a later edition, reproduced below details the specific acts for which the award was granted. The Gazette doesn’t give a location, but the award may have related to an earlier incident at High Wood or Wood Lane at the Somme, as the major offensive commenced there on 14 July 1916, with Baillie being mentioned in dispatches on 9 September 1916 after the award was granted.

IMAGE RIGHT:  Supplement to the London Gazette for the 19th of August, 1916 showing the citation for Baillie’s Military Cross.

The following is an extract from the account by Major-General Sir Steuart HARE titled “The Annals of the King’s Royal Rifle Corps, Vol. V, The Great War”, and details the 9th September 1916 attack on Wood Lane:  “On the XV Corps front the 1st Division attacked in High Wood and Wood Lane, a trench running south-east from the edge of the wood. The 2nd Brigade attacked this trench and a part of the wood. Our 2nd Battalion, in the command of which Major R.N. Abadie had succeeded Major Atkinson, attacked on the right, with the 2nd Royal Sussex on their left, and the 1st Northamptonshire beyond them in the wood. The attack was a brilliant success, and casualties were moderate as things went on the Somme. To quote the ‘War Diary’: ‘At 4:45 p.m. our artillery opened an intense barrage on Wood Lane, and at the same time our men went over the parapet. The assault, which was delivered with much dash, was quite successful on the left. Here C Company carried their objective without any great effort or much loss. On the right D Company was held up by machine-gun fire, and the two platoons of B Company who were to support the attack on this flank were also stopped. Sergeant-Major Hyde was killed while endeavoring to lead forward the men of B Company. A fresh attack was organized on this flank. Stokes mortars and Lewis-gun fire subdued the enemy’s resistance, and on the threat of assault the remainder of the Germans surrendered. Their machine guns and the teams that had fought them had been put out of action by our Stokes mortars, and by 2nd Lieutenant Munro’s fire from a Lewis gun. The remains of D Company (every officer of whom had been hit), supported by B Company, then carried their objective. Connection was established with the 5th King’s Liverpool Regiment on the right, and with C Company on the left. C Company at the same time was in touch with the 2nd Royal Sussex, so that the whole line was firmly established in Wood Lane. The remainder of the day and the whole night were occupied in consolidating these positions.’ “Next day the captured line having been turned, and being lightly held by posts and Lewis guns, the enemy began to shell it heavily, and parties of them were continually seen crossing the front into High Wood, in which, evidently a counter-attack was being prepared. Our artillery put down a heavy barrage on the wood, and the attack never developed. On the night of the 10th/11th the Battalion was relieved by the New Zealanders. The Battalion lost 2nd Lieutenants A.E.M.A. Hawke and A.H.B. Langton, both of whom died of wounds, and Captains F.G. Fison, L.A. Blackett, 2nd Lieutenants J.W.D. Sneddon, B.C. Munro, J.H. Lee, C.W. Beadel, wounded. The casualties among other ranks were 24 killed, 82 wounded, 36 missing. The Battalion took 59 prisoners and two machine guns.”

IMAGE LEFT:  A Military Cross, as awarded to 2nd Lieutenant Baillie Chisholm MUNRO.

Major-General Sir Steuart Hare may have been quoting from this War Diary extract for the same day: “9th September 1916 – Orders arrived that the attack would take place at 4.45 pm. During the morning ‘A’ Coy. was relieved by ‘D’ Coy. and ‘B’ Coy. moved up into close support in SEAFORTH TRENCH some 50 yards away from out front line. ‘A’ Coy. went into RIFLES TRENCH in the 3rd line, while ‘C’ Coy. remained in its original position. Lt. [temp. Capt.] L. A. BLACKETT was unfortunately hit by fragments from a bomb, which had been exploded by a shell, while waiting in the front line to lead his company in the attack. The command of ‘C’ Coy was taken over by 2nd Lt. LEE. At 4.45 pm. the guns opened with an intense barrage and at the same moment our men went over the parapet. The assault delivered with much dash, was entirely successful on the left. Here ‘C’ Coy. carried their objective without any great effort or much loss. On the right ‘D’ Coy was held up by MG fire and the two platoons of ‘B’ Coy. who were to support them on the right were also stopped – Lt. MUNRO, commanding ‘B’ Coy. organized a fresh attack by orders of the Commanding Officer – Stokes Mortars and Lewis gun fire subdued the enemy’s resistance and on the threat of assault he surrendered. The remains of ‘D’ Coy. and half ‘B’ Coy. then carried their objective and joined touch with the 5th Kings Liverpool Regiment on their right, and with ‘C’ Coy. on their left. ‘C’ Company, at the same time was in touch with the 2nd Royal Sussex so that the whole line then stood firmly in WOOD LANE.”

Recuperating from his injuries incurred on the 9th September and whilst on leave, Baillie returned to Inverness in Scotland where his mother now resided at Naverton, Drummond Road.  On Boxing Day of 1916, he married his mother’s neighbour – Isabella Mary Fraser at her Moorlands, Drummond Road residence.  A witness to the marriage was Baillie’s barrister brother John, who was now a Lieutenant with the 44th New Brunswick Battalion, Canadian Expeditionary Force.  Sadly John was killed in action at Vimy Ridge, France on 10th April, 1917.  The Commonwealth War Graves Commission records indicate that John was buried at La Chaudiere Military Cemetery, Vimy. 

IMAGE RIGHT:  Extract from the Record of Marriages for 1916 in the County of Inverness, showing the marriage of Baillie Chisholm MUNRO to Isabella “Ella” Mary FRASER.  Of note is the fact that Baillie actually records the initials ‘M.C.’ after his title.  This would end up another of those tragic ‘wartime’ romances which brings to mind the lyrics from the Eric Bogle song -Green Fields Of France …….”Did you leave there a wife, or a sweetheart behind – in some faithful heart – is your memory enshrined.  Although you died back, in 1916 – in that faithful heart – are you forever 19? …….” 

IMAGE RIGHT:  The Campaign card for Baillie Chisholm MUNRO showing the award of the 1914-1915 Star, British War Medal and Victory Medal.  Strangely there is no mention of Baillie being awarded the Military Cross on this document. 

IMAGE ABOVE: Record card, indicating that Baillie was awarded the Military Cross and ‘Mentioned In Dispatches’.

 That Baillie should play such an active role at the Somme and survive was no mean feat.  However his good fortune on the battlefields finally deserted him at the Battle of Nieuport Bains in Flanders on 10 July, 1917. The Germans referred to the battle as Operation Strandfest, which translates to “beach party”, but it was no party for the Kings Royal Rifle Corps and the 1st Northamptonshire Regiment. The following article from “The Long. Long Trail” web site gives an excellent account of the battle, and is reproduced here with the kind permission of it’s author, Robert DUNLOP:

“On the 20 June, the British XV Corps took over the French sector on the Belgian coast. The Marines Korps Flandern patrols detected the changeover on the 21st.  Korps commander von Schroeder correctly interpreted this report as the prelude to a British attack along the coast.  He began planning Operation Strandfest, a pre-emptive strike to eliminate the Yser bridgehead.  Meanwhile, the British set about improving the defences in the bridgehead.  Tunnellers were used, including the 257th and the 2nd Australian Tunnelling Companies, but their work was not complete when Operation Strandfest began.  Nor was all the British artillery in place; only 176 of the planned 583 guns and howitzers were available to defend the bridgehead.  On the 6 July 1917, the MarinesKorps Flandern began a desultory artillery bombardment, which continued for the next three days.  Fog and low cloud prevented detection of the German build-up. Then, at 5.30am on the the 10 July the massed German artillery, including three 24cm naval guns in shore batteries and 58 artillery batteries (planned naval gunfire support from destroyers and torpedo-boats was cancelled), opened up on the British positions in the bridgehead. Mustard gas (Yellow Cross) was used for the first time in the barrage.  All but one of the bridges over the Yser River were demolished, isolating the 1/Northamptonshire and 2/KRRC of 2nd Brigade, 1st Division on the extreme left flank.  Telephone communication was also cut.  The German bombardment continued throughout the day.  The British artillery attempted a counter-barrage but several guns were knocked out and the German infantry were well protected.  At 8pm, the Marines Korps launched the infantry assault, by which time the two British battalions had suffered 70-80% casualties.  The German stormtroopers attacked down the coast, outflanking the British.  Their attack was then followed by waves of German Marines, supported by flamethrower teams to mop up dugouts.  After a gallant defence, the British battalions were overwhelmed.  Only 4 officers and 64 other ranks managed to reach the west bank of the Yser”.

IMAGE RIGHT:  Map of Operation Strandfest, dated the 10th of July, 1917.  (Image courtesy of members of The Great War Forum)

Robert DUNLOP continues:- “The German attack on the 32nd Division, further to the east, was less successful.  Only the 97th Brigade was attacked and although there was some penetration into the line, a counterattack that night by the 11/Border Regiment, supported by two companies of the 17/Highland Light Infantry, restored all but 500 yards of the front line.  A general counterattack was ordered for the 11 July by General RAWLINSON.  Wisely, he later rescinded his decision at the request of XV Corps Commander, Lt. General John Du CANE.  The total British casualties amounted to approximately 3,126 of all ranks, killed, wounded and missing.  Of these, fifty officers and 1,253 other ranks belonged to the two battalions of 1st Division.  Lieutenant Colonel Richard ABADIE DSO, Officer Commanding 2/KRRC, has no known grave and is commemorated on the Nieuport Memorial to the Missing.”

 British troops held the territory west of the Yser, and on the eastern bank occupied a front line of some 1400 yards stretching from the North Sea towards Nieuport, that was approximately 600 yards wide at the river mouth. The British Army had taken this Nieuport Bains east bank sector over from the French in June 1917, and had access to it via four temporary bridges. The 2nd Battalion of the Kings Royal Rifle Corps, and the 1st Battalion, the Northamptonshire Regiment, defended the front line equally, or 700 yards each in round figures, with the Kings Royal Rifle Corps holding the dune sector against the North Sea, and the 1st Northamptonshire Regiment controlling the adjoining sector towards Nieuport. The following War Diary extracts detail the exact positions of the Kings Royal Rifle Corps Companies on 10 July, 1917. Note that these extracts and others that follow are protected by Crown Copyright, and as such may not be reproduced for profit without permission. For those interested, complete War Diaries can be downloaded from the National Archives for very reasonable prices by clicking here.

IMAGE LEFT: Captain Humphrey BUTLER’s official report has been re-written and edited by his superior officers and part of the final version is reproduced here.  In this report, Captain BUTLER describes the positions of the companies attached to the King’s Royal Rifles on the 10th of July, 1917.  Handwritten notes on the report are those of Lt. Gen. Sir Henry RAWLINSON and it is interesting to note his comment that the K.R.R.C had already been four times decimated since the beginning of the war.

Lieutenant MUNRO and “B” Company were stationed furthest to the right of the three Kings Royal Rifle Corps Companies, so that would locate them roughly 600 yards from the North Sea but still on the dunes, and 600 yards east of the Yser River. Using the above map as a reference, they would be on the British front line as indicated in red, and towards the right hand extremity of the dunes. The British, as did the French before them, found the dunes to be extremely difficult to defend – in the words of Captain Humphrey BUTLER, Adjutant, 2nd. Bn. K.R.R.C.:
“The trenches taken over from the French were of a somewhat sketchy nature, and indeed in the absence of concrete it was difficult for them to be anything else. As a protection they were most imperfect. It was obvious to the veriest tyro that the most unremitting vigilance, the support of the most powerful artillery fire, the closest co-operation between the naval and military forces were essential if the position were to be tenable even for only a few hours. The orders, given to the Battalion Commanders were to hold on to the last; a strong support being thus virtually promised. The French, and before them the Belgians, aware of the weakness of the post, had been most careful to do nothing that could attract attention or raise an alarm on the part of the enemy. Our Battalion Commanders were given to understand that for similar reasons and in view of impending operations they were to keep equally quiet. But in direct contradiction of these general instructions, they were ordered to make raids upon the enemy’s entrenchments, and to these contradictory orders the subsequent tragedy may probably be traced.”

IMAGE RIGHT:  Photographic image of the improvised British shelters on the Yser east bank, 1917.

Captain BUTLER was understandably upset, as casualties included 17 out of 20 officers and 481 out of 520 other ranks. Communication was a contentious issue, as was lack of support, with promised air support being absent for the entire day, and of the 176 guns and howitzers in place none were registered on the German front line. Captain Butler was advised that winds off the coast were light, and felt that their Naval Commanders should have taken the initiative rather than wait for explicit orders, but according to comments made by Lieutenant-General Sir Henry RAWLINSON, they were not in a position to act as winds were in fact strong, and ships would have been lost to superior German vessels and long range artillery on the shore line. The Germans also reported high winds, and were unable to use their Naval artillery against the British.

The following War Diary extract from correspondence between Captain Humphrey BUTLER and his father, Lt.-Col. Lewis BUTLER, tells us how Lt. Baillee Chisholm MUNRO met his fate.:

IMAGE LEFT: Extract from a private report of Captain Humphrey BUTLER (Adjutant 2nd Battalion K.R.R.C) to his father, Lt. Col. Lewis BUTLER. 


 IMAGE RIGHT:  This report is confirmed by the official report that has 2nd Lt. Taylor relating basically the same news shortly after mid-day on 10 July.

Captain BUTLER laid blame for the defeat squarely on the shoulders of his Corps Commander saying “The whole episode demands a most searching enquiry. It is difficult to avoid the inference that the Corps Commander, failing to appreciate the importance of the position and it’s imminent peril, neglected the measures essential for co-operation and support.” The Captain’s “official” report is not the original version, and some apparent inconsistencies may have resulted from editing that took place in attempts to soften criticism of his superiors. One such inconsistency lies in determining the approximate time at which  the Battalion Commander had knowledge of the loss of “B” Company H.Q. The “official” report above, times 2nd Lieut.Taylor’s arrival at Battalion H.Q. as shortly after Lieut. Gott had left on his noon mission and returned, leaving the impression that this was the first information they had received on the fate of “B” Company and Lieutenant MUNRO, as there was no prior mention in the report, but the 1st Northamptonshire war diaries place a different time frame on events:

IMAGE LEFT:  Officer commanding, Lt. Col. Richard ABADIE of the K.R.R.C reporting to the commander of the 1st Northamptonshire Regiment that right company H.Q, being ‘B’ Company, was blown in at 11.07am. This information is inconsistent with the K.R.R.C official report. 

Officer Commanding, Lieutenant Colonel ABADIE, who died valiantly later that same day, informed the 1st Northamptonshire Regiment that Kings Royal Rifle Corps Right Company H.Q. had been blown in, and sent the message by pigeon at 11.07 a.m. Lieut.-Col.Abadie had eight pigeons, and found it necessary to use them as the Fuller ‘phone wires had been cut at 9.50 a.m., and no-one was responding to a buried telephone wire extending to the west bank. Lieut.-Gen.Sir Henry Rawlinson commented that all pigeons “seemed” to have reached their destinations.  It was inconceivable that Lieutenant Colonel ABADIE would not have dispatched one or more birds to his own Corps Commander at that time. The Corps Commander, given better communications may have made different decisions, but ordering the Kings Royal Rifle Corps to conduct raids against a superior force from trenches that offered no protection, and with no support from air, land or sea, was folly. Many good men were lost that day, with one being Lieutenant Baillie Chisholm MUNRO M.C.

IMAGE RIGHT:  A graphic photo of British casualties on the dunes, circa 10th of July, 1917.  Could Baillie Chisholm MUNRO be amongst the dead, pictured here? (Image courtesy of members of The Great War Forum).

Captain Humphrey Butler’s report was most damning of Corps Commander du Cane, the very person with whom he would have discussed the contents before it reached the desk of Lieutenant General Sir Henry RAWLINSON, so one wonders what editing may have been done at this stage.  John Philip du CANE was commissioned into the Royal Artillery in 1884 and served in the Second Boer War before becoming Commander of the 15th Corps in 1916. He rose to become General Officer Commanding-in-Chief for the British Army of the Rhine, and finally Governor and Commander-in-Chief of Malta, so Captain Butler’s report certainly did him no harm. The last four pages of Captain Butler’s report have been reproduced here, and once again the hand-written comments are those of Lieut.-Gen.Sir Henry RAWLINSON:

IMAGE LEFT: Page 16 of Captain BUTLER’s official 19 page report.  The handwritten notes are those of Lieutenant General Sir Henry RAWLINSON.

Captain BUTLER is critical of the orders to commence raids, to which Lt. Gen. RAWLINSON has replied “the position was taken up at a time when the corps artillery most wanted direction, could not be used in support”.  RAWLINSON’s notation in pencil at the bottom of page 16 confirms the number killed as 7 with 10 prisoners of whom 5 were wounded. 


IMAGE RIGHT:  Page 17 of Captain BUTLER’s official report. 

Lieutenant General RAWLINSON agrees that support and communication were impossible after the bridges were gone, but contradicts himself on the same page where he says that a buried telephone line was constantly in use as far as the left bank.  Why did Lieutenant Colonel ABADIE need to resort to the use of carrier pigeons if this line was intact?  Strangely RAWLINSON does not respond to BUTLER’s claim that the Corps Commander may have been absent on duty. 


IMAGE LEFT:  Page 18 of Captain BUTLER’s official report.

Captain BUTLER was disgusted by the insensitivity displayed by Corps Commander du CANE when addressing the surviving officers of his King’s Royal Rifle Corps.  BUTLER blamed du CANE for the disastrous consequences, yet du CANE had the nerve to attribute ‘no blame’ to his officers on account of the ground lost when he should have been praising their efforts.  Captain BUTLER was also speaking on behalf of the Northamptonshire Regiment, of whom no officers survived and accordingly, no member of this regiment was present for this insulting address. 

IMAGE RIGHT:  Page 19 and final page of Captain BUTLER’s offical report.

Lieutenant General RAWLINSON comments here that Captain BUTLER had been “unreasonably venomous” in respect of du CANE’s behaviour and the lack of naval support. The wind was in fact  off the shore, as RAWLINSON notes here, and he comments further “you forget that there are between 20 & 30 German quick firing coast defense guns that command any position from which the ships can fire”.

Right or wrong Captain Butler should be applauded for stating the facts as he saw them in what could not be considered a good career move. Corps Commander du CANE was experienced and should have known better. From a military point of view it would have been advantageous to control the Yser river mouth, but the topography was such that the position could never be suitably fortified or defended. The French and the Belgians knew that, as did the Germans, who rather than place themselves in harm’s way were able to control the dunes from the air, sea and with their artillery. Little wonder that Captain Butler took issue with Corps Commander du Cane for conducting raids from the dunes and costing so many men their lives.

Baillie Chisholm Munro’s name appears on the Nieuport Memorial as one of 548 officers and men of United Kingdom forces who died during the First World War in operations on the Belgian Coast, and whose graves are not known. 

The war service medals awarded to Baillie include the Military Cross which was awarded in 1916. The 1914-1915 Star and Clasp, the British War and the Victory medal – were all awarded posthumously in 1920 following applications by his widow Isabella.  Her daughter, Minna Baillie Chisholm Munro, who was born in 1917 after her father had perished, became Dr Minna Baillie Chisholm MUNRO M.B., Ch.B.   She would marry Mr. Alexander Henderson at Edinburgh in 1942; and according to the 1959 United Kingdom Medical Register, was living at North Park Road, Bradford.  Minna of course never met her father, but must have been immensely proud of him.

IMAGE LEFT:  The Military Cross, 1914-1915 Star, British War Medal and Victory Medal as awarded to Baillie Chisholm MUNRO.

This story was composed by Mr. Paul MUNRO who states that he is a distant cousin of Baillie Chisholm MUNRO.  He would like to thank the National Archives, Ancestry.com, the website ‘The Long Long Trail’ and ‘The Great War Forum’.   Paul MUNRO from Australia is researching Baillie Chisholm MUNRO’s family tree and would keenly like to make contact with other relatives of Baillie.  Paul can be contacted on email:-  

ADMINISTRATOR’S NOTE:  A British War Medal sold on the open market on the 12th of April, 2008.  The identity of the seller and the purchaser are not known.  This medal was inscribed on the rim with the recipient’s name; however it is evident that the medal was well ‘worn’ and as a result, the inscription is not clear.  The war medal may have borne the name “B.C. MUNRO” or “R.G. MUNRO”.  As can be seen, if the first two initials were subject to wear, it would be difficult to distinguish between the two.  Mr. Paul Munro has asked that if the current owner of the British War Medal reads this story, could he please contact him through the Medals Gone Missing website.  Alternatively, if you know of the whereabouts of Baillie’s other war service medals ….. or you are a relative of Baillie Chisholm MUNRO, could you also please make contact.

  • Delicious
  • Facebook
  • Digg
  • Reddit
  • StumbleUpon
  • Twitter
Posted in Honour Roll - British Stories, Military Medals | Tagged | Leave a comment

Necessity …. The Mother of All Invention – William BEECH & The ‘Beech Periscope Rifle’ – Gallipoli 1915

“The sap was between 70 and 80 yards in length, and along it lay several dead Turks.  On reaching the head of it we found five of our men dead, including Sergeant Higgins and Fred Thompson, both of whom were alive when Beech left to get reinforcements.  We saw that they had been shot through the head.  Thus a periscope was essential to our very existence, and one was found under the bodies.  Beech immediately put it up, and was alarmed by what he saw.  Taking the periscope from him, I too received a shock at the sight of what I estimated to be four battalions of Turks forming up for another attack.  Bombs were as distant as the moon, our only weapons being rifles and bayonets.  Had we attempted to aim over the top we would have exposed our head and shoulders, and have immediately followed our dead pals, who had been shot through the head from the high ridges flanking the ravine.  Beech, with tears running down his cheeks, momentarily criticised our awful predicament and remarked, “It’s hell to see this mass of Turks and not being able to bomb or aim at them”.  With a periscope fixed to a rifle, it would be possible he said, to fire accurately without personal danger.    Lieutenant John ADAMS,  M.C.  54th Battalion.

Those of you who have visited the Gallipoli Battlefields, have no doubt travelled through the area where “the sap” occupied by ADAMS and BEECH is located.  But how many have actually stopped to view the gully, where so many Turks were massing for this attack upon the Anzac line – on the 19th of May, 1915?  Like so many other historical “pockets of resistance” that have become the subject of legends; the fighting on this day deserves to be etched into the annals of military history.  Whilst some may suggest that this particular fight does not compare to Rorke’s Drift for the Welsh, Camerone to the French Foreign Legion or the stand made by the Texans at ‘The Alamo’ …. for the small party of men of the 2nd Infantry Battalion, AIF – the threat to personal safety and feeling of isolation was just as intense.
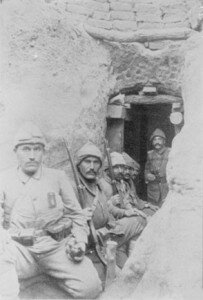
IMAGE RIGHT:  Ottomon troops in their trenches at Gallipoli.  It is only when you look into the faces of men such as this; that we as people of the British Commonwealth, see the ‘human’ side of our enemy.  No doubt, the descendants of these very men – are the same people who welcome us with open arms to their country in modern times.

At the time of this incident, Lieutenant John ADAMS was serving as Private John ADAMS, Service Number 256.  He would survive the war; be promoted through the ranks to commissioned officer and be awarded the Military Cross.  The “gully” referred to in ADAMS’ quotation would be given the name Owen’s Gully; and is situated on the landward side of the 400 Plateau between the northern lobe of Johnston’s Jolly and the southern lobe of Lone Pine.  This gully leads down towards Legge Valley and it was from this ‘dead ground’ that the Turkish troops would be mustered to gather before their attack.   However the acclaim of ‘bravery’ is not solely owned by the Australians, New Zealanders and British troops who resisted this overwhelming assault.  But also to the Ottoman troops who were sent forward to attack – up and down the Anzac line, in a bid to push the invaders back into the sea.  Turkish casualties numbered in their thousands ….. however the Ottomons would have their own turn when the Allies tried a similar assault just three months later.  
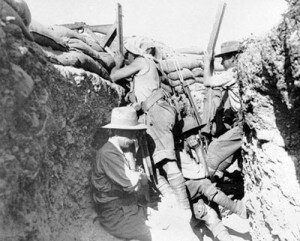
IMAGE LEFT:  Perhaps the most famous of all photographs, depicting the Beech Periscope Rifle.  Here, a sniper takes aim at the Turkish positions whilst an ‘observer’ takes note of possible targets and relates the fall of shot.   It would become the practice of most sniper teams to work in pairs or teams, such as this.  Note how this particular example is constructed, with the main ‘angled’ timber body, supporting the rifle on the pistol grip of the weapon (aft of the trigger guard).

Whilst ADAMS would later record “Occasionally we glanced through the periscope.  Officers were shouting excitedly and striking their men across the backs and legs with swords in an attempt to get them into position”, in other parts of the line – acts of self sacrifice on behalf of the Turkish Officers were noted.  In a bid to rally their troops, many Ottomon leaders attempted to inspire their men by example.  One such incident occurred involving the 1st Battalion of the 57th Turkish Regiment, facing the right of the Anzac trenches dug in on Pope’s Hill.  It is testimony to the courage of a group of young Ottomon cadet officers, who had only joined the regiment from Constantinople on the previous evening.  By dusk on the 19th of May, five out of the six cadets lay dead upon their own parapet.

And facing such unwavering bravery were men such a Lance Corporal BEECH of ‘A’ Company, 2nd Infantry Battalion AIF.  Born in Wellington (England) in the shire of Shropshire; BEECH was one of countless Englishmen to enlisted into the Australian Imperial Force at the outbreak of war.   In fact, it is interesting to note that around 16% of men who enlisted into the 1st Australian Division during 1914 had previously served in British Forces.  A perusal of William’s service record (National Archives of Australia) indicates that he was an older recruit at 36 years of age, enlisting on the 24th of September, 1914 at Kensington.   His civilian occupation of “Builders Foreman” placed him in good stead for what was to eventuate in May of the following year.
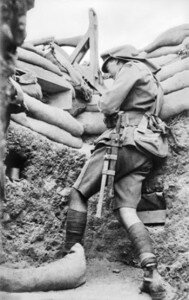
IMAGE RIGHT:  Another photograph of the Beech Periscope Rifle being used in the trenches at Gallipoli.  This image also shows the main body of the periscope being attached to the pistol grip of the rifle in a fixture point behind the trigger guard.  Close inspection of the photograph reveals that wire or other similar strand has been wrapped around the pistol grip in order to anchor the rifle to the periscope. (PLEASE CLICK ON IMAGE TO ENLARGE)

William BEECH was no stranger to military service.  A veteran of the Boer War – he had served for two years in South Africa  as a member of the Volunteer Field Artillery.  Before that, he had 5 years service in the Shropshire Yeomanry Cavalry.   No doubt, his maturity and previous military experience showed his leadership qualities and he was promoted to Lance Corporal just 12 days after the Gallipoli landing.  He had hardly been on the peninsula for three weeks when the Turks launched their massive “May Offensive” at the Anzac positions.  Holding on to their precarious positions on the Second Ridge, the Anzacs had their backs to the sea.  Should the line held by the diggers fail - at any one of a number of keys points between Russells’s Top and the 400 Plateau under the Turkish onslaught ….. disaster would result for the Allies . 

As indicated by the testimony of Private John ADAMS, there is no doubt that the events of the 19th of May had a profound effect upon William BEECH.   To be brought to tears as a result of seeing his comrades slain through a bullet to the head – a comment by General Birdwood himself (much later down the track) gives credence to the fact that the thought processes of Lance Corporal William BEECH deserve a place in Australian engineering history.  And to reinforce the comment made by BEECH near Owen’s Gully  ”With a periscope fixed to a rifle, it would be possible to fire accurately without personal danger”, the Builder’s Foreman set his inventive mind into motion and devised such an article.
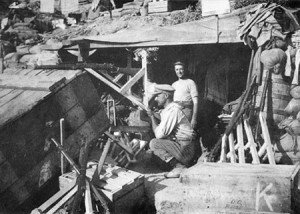
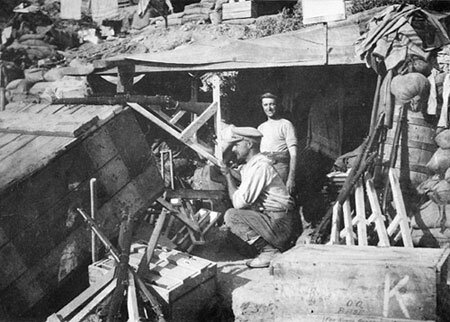
IMAGE LEFT:  Photograph of the “factory on the beach” as recorded in the Official History of Australia in the War of 1914-1918 (Volume II, page 251) by C.E.W. BEAN.  The man with the periscope rifle is believed to be Lance Corporal (later Sergeant) William Charles Bullock BEECH himself.  As William BEECH was 36 years old upon enlistment, it is likely that the subject behind the rifle is in fact the inventor of this device.  This photo clearly shows at least 9 recently constructed periscope rifles, ready to be issued to troops in the front line. It is clear from this photograph that conventional screws and nails were being used in the construction process.  These newly produced devices are completely devoid of any wire or similar being used to brace the joints of the framework.  The claim of the periscopes being made from “broken boxwood and wire” more than likely refers only to BEECH’s prototype which was made in the front line where proper carpentry tools and building materials were not available.  (PLEASE CLICK ON IMAGE TO ENLARGE)

At Gallipoli in 1915, Lance Corporal William BEECH mounted a standard .303 calibre Lee-Enfield rifle onto a timber frame – fitted out with two angled mirrors (of the size of a pocket mirror) in the form of a “periscope” which gave view along the sights of the rifle.  By fitting a string or to the trigger, the “periscope rifle” could then be hoisted onto the parapet of one’s trench and operated in comparative safety.  The actuation of the trigger from well below the firing line, allowed the operator to be beneath the line of fire (and subsequently – clear of the enemy’s line of sight).  Bean’s official history records on page 250 ….. “On May 19th Major Blamey, going round the front trench of the Pimple during the last hours of the Turkish attack, had observed two men of the 2nd Battalion engrossed with a framework of broken box-wood and wire, attached to a rifle, which they were endeavouring to lay on the parapet.  “An arrangement so that you can hit without being hit” one of them explained.   It was a device for aiming a rifle by means of a periscope so fixed that the upper glass looked along the sights, while the sniper gazed into the lower one.  Blamey believed believed that the device might be valuable, and the inventor, Lance-Corporal BEECH was afterwards brought to headquarters to applied it to a number of rifles.  By May 26th, a factory was started on the Beach”. 

 It is clear from this comment that BEECH wasted no time in building his device.  With the incident in the sap at Owen’s Gully occurring in the early morning of 19th May, BLAMEY saw two men …. one of which clearly was BEECH …. in the afternoon of that same day with a prototype periscope rifle.  That these men could construct such an article in the front line, during a battle – was a display of both ingenuity and resourcefulness.
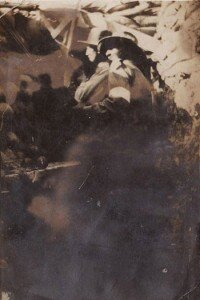
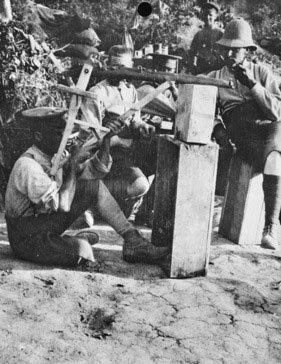
IMAGE RIGHT:  A photograph from a contemporary postcard of the era, showing a Beech Periscope Rifle at Quinn’s Post.  It is possible that this photograph was taken around August of 1915, owing to the white armband which can be seen on the left arm of the subject in the foreground.  These armbands were worn on the sleeve; and white patches of material sewn onto the backs of the Australian uniforms,  for identification purposes during the August offensive.

By clicking on the image of  ‘the factory on the beach’,  the enlargement clearly shows that the joins of the periscope frame are secured by way of two screws on each join.  From the “broken box-wood and wire” of the first prototype on the 400 Plateau; to the production method of joining the timber by way of screws and nails as evident in this photo – there is little doubt that the Staff at Division Headquarters took this new invention quite seriously.
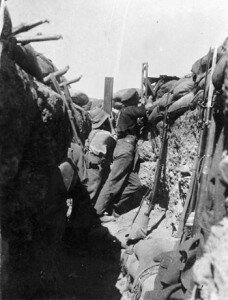
IMAGE LEFT:  A sniper team (Beech Periscope Rifle operator and observer) man a trench somewhere on the Gallipoli peninsula.  Note that other rifles with bayonets fixed, are standing nearby in the trench ‘at the ready’.

The official history went on to record:- The first periscope rifle had been taken into Quinn’s on the previous day, the man who carried it up the path remarking to the puzzled onlookers, “I’m tired of fightin’ Turks; I’m goin’ to play them cricket”.  It was tested at many posts, and at ranges up to 200 or 300 yards was found to be an accurate and deadly weapon.  From that time it was constantly used by the Anzac troops wherever the trenches were close. 

  Up until the periscope rifle came into use, it had been virtually impossible to raise one’s head at Quinn’s to fire back at the enemy because of the proximity of the Turkish trenches and snipers higher up the slope. With this invention the garrison at Quinn’s was able, at last, to hit back effectively.
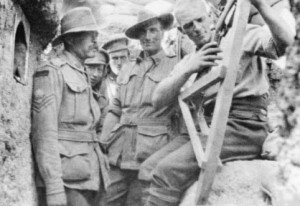
IMAGE RIGHT:Australian War Memorial image number P02282.039 is the only photograph which illustrates a man in the process of ‘cycling the action’ of his .303 rifle whilst attached to a periscope.  The photographer was said to be Walter Ormond Stevenson and donated by D. Stevenson.  The narrative pertaining to this image records:- Gallipoli, Turkey, 1915.  In a deep trench, an Australian soldier (right) prepares a periscope rifle for firing while several of his colleagues look on.  At left, an empty biscuit tin has been fitted into a cavity hollowed out in the trench wall in order to provide storage space. The soldier (left) is a Staff Sergeant.

 Whilst the Service Records of William BEECH do not specifically state the date in which he landed at Anzac, it is believed that he came ashore with the rest of the 2nd Battalion between 5.30am and 7.30am on that first day -the 25th of April, 1915.  The Official History indicates that the 2nd Battalion landed with a strength of 31 Officers and 937 other ranks.   As an indicator as to the loss of officers and N.C.O’s in those first few days on the peninsula, page 10 of William’s Service Record indicates that he was appointed to the rank of Lance Corporal on the  7th of May, 1915.   As already stated, a large Turkish offensive took place on the 19th of May and it was on this date that the concept of a “periscope rifle” came to fruition.  We know that the “factory on the beach” was set up on or around the 26th of May.  And having demonstrated his device to senior officers; his service records show that William was temporarily attached to Divisional H.Q. on the 30th of May, 1915.     Things were happening fairly quickly for William as on the 1st of June, 1915 he was promoted to the rank of Sergeant.  On the 26th of June, 1915 William was transferred from ‘A’ Coy to ‘C’ Coy of the 2nd Infantry Battalion.  And a slight discrepancy in the recording of dates within his service record, state that he was transferred from the 2nd Battalion to Anzac Corps HQ on the 1st of August, 1915.  An entry on his dossier records that he embarked on the “Kingstonian” for duty for General Jackson on the 6th of August, 1915.  This transfer actually assisted him in averting participation in the August Offensive where his Battalion made an attack upon Lone Pine.  On the 10th of September, 1915 he was attached to the Ordnance Department at Alexandria.  William was due to return to the Kingstonian on that same date but reported sick on the morning of embarkation, suffering from acute rheumatism.  His record goes on to state that William contracted a bout of Malaria on or around the 5th of October, 1915 and his health would not recover sufficiently to see him return to active duty.   Around the 4th of November, 1915 William was invalided back to Australia for a designated 3 months period of “change” per H.S. Karoola – suffering sciatica and Neurasthenia.  His health precluded him from any further service within the AIF and he was subsequently discharged on the 27th of February, 1916.  He settled onto a property titled “Reefdale” in Condobolin, New South Wales.
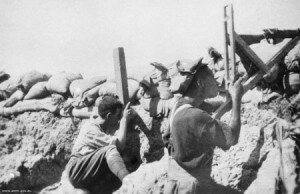
IMAGE LEFT:  Another photograph of the design which placed the angled support timber in front of the magazine on the fore guard of the rifle.  This image from the Australian War Memorial, number A05767  may have been taken around August of 1915 and shows a sniper team in a front line trench.  The AWM photo description states:- Gallipoli 1915-08.  A sniping pair in a front line trench.  An observer is looking for targets through a periscope while the sniper waits ready with a rifle with a periscope sight.  This is a typical sniping team developed by Australians at Gallipoli.  Note the soft cloth cap on the soldier on the right, which helps camouflage his position. (DONOR: T. YEOMANS).

Page 12 of William’s Service Record kept by the National Archives Of Australia (Casualty Form – Active Service) a notation at the top in pencil indicates the words:- Periscope Rifle Inventor.  Evident on page 14 of his service record  is a letter, typed by BEECH to the Commonwealth of Australia Department of Repatriation and is dated 30th January, 1920.  In this correspondence, William BEECH seeks official recognition and possible monetary reward for his invention.   As a result of William’s application, a letter from the Patent Rewards and Royalties Section dated 12th June, 1920 was forwarded to General W.R. Birdwood for his opinion regarding the claim.   This was duplicated by a letter written by the War Office in London to General Birdwood dated 19th August, 1920.   A reply from General Birdwood to The Secretary of the War Office in Whitehall, London was forwarded on the 14th of September, 1920.  In this response, BIRDWOOD wrote “I now write to inform you that I concur in the statements made by Mr W.C.BEECH in his letter of the 30th of January 1920.   From my personal observations, I am able to speak of the considerable value of his device to our troops in Gallipoli and I may state that every Battalion that we had with us, very greatly appreciated Mr Beech’s device then.  I am, therefore, very glad to be able to fully support Mr Beech’s claims for a reward”.  (Page 18 – Service Record of William Beech – National Archives of Australia)

A letter from the Secretary, Department of Defence, Melbourne Victoria dated 6th July, 1921 stated “I desire to inform you that the War Office have now offered a reward of 100 pounds to Mr. Beech in his connection”.  Having gone through the due process, William BEECH was finally recognised and officially rewarded for his invention.
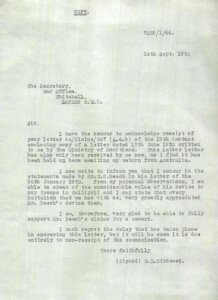
IMAGE RIGHT:  The letter signed off by General BIRDWOOD himself, giving full credit for the periscope rifle to William Charles BEECH and supporting his claim for a monetary reward for the invention.

Of note in William’s service record is a letter, written by his son, (William Bulloch BEECH) making a formal request to claim his father’s entitlement of the Gallipoli Medallion.  William junior, served with the Second AIF during World War Two with the 2/7th Armoured Regiment (Service Number NX 44959).  The letter is dated the 24th of March, 1967 and posted from an address at 206 Bathurst St, Condobolin.
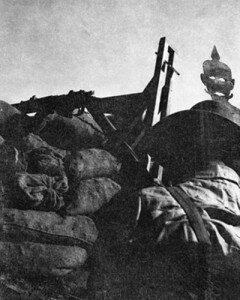
 

IMAGE LEFT:  A sniper with a sense of humour.  A Gallipoli sniper takes aim with his Beech Periscope Rifle alongside an effigy of the ‘Kaiser’.  Like many of the other examples, the main supporting timber has been secured to the pistol grip of the rifle (just behind the trigger).  As can be seen when viewing the other photographs taken of Beech Periscope Rifles at Anzac; this seems to be the trend in manufacture.  The exception to the rule, being the image of the “factory on the beach”, which shows the supporting timber being fixed well forward along the furniture of the rifle, between the magazine and the front sling swivel.  Strangely enough, there are no detailed plans on hand at the Australian War Memorial – indicating a preference in design or method of manufacture.  Nor any comparisons made as to which method was superior in terms of trigger control and accuracy i.e. in front of ….. or behind, the trigger guard.

An entry from the diary of one Gallipoli veteran, is an indicator of the skill displayed by the Turkish marksmen.  This little extract details trenchlife from the Australian perspective.  “In the trenches you can see nothing either to the front or rear but the little length of trench that you happen to be in, and it is sure death to put your head up to look around. Even the periscope mirrors measuring only three inches square at most are picked off one after the other”.  [The Gallipoli Diary of Sergeant Lawrence, Sir Ronald East (ed), Melbourne, 1983, pp.21-22]
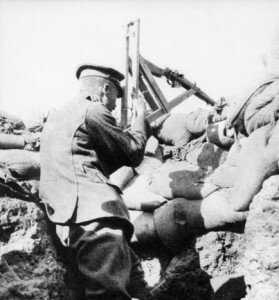
IMAGE RIGHT:  Australian War Memorial image number A04045; supplied to the memorial by Major C. Clarence JACKSON, 1st Infantry Battalion, AIF.  This photograph shows one of the most famous diggers to come about from the Gallipoli story, Lieutenant A.J. SHOUT, 1st Battalion AIF (later Captain, VC and MC), sniping with a periscope rifle.

Credit for the original invention of the periscope rifle at Gallipoli is usually given to Sergeant William Beech; and this is well supported by the above mentioned ‘BIRDWOOD’ letter.   However, according to the Australian War Memorial - a South Australian by the name of  Private George TOSTEE (Service Number 347) of the 10th Battalion, is also known to have demonstrated the new device to his Commanding Officers.   Australian War Memorial image number P02321.022 below shows Private TOSTEE demonstrating this different design to his commanding officer on Gallipoli.  Though based on similar principles to the periscope created  by William Beech, there is no further photographic evidence to suggest that it was manufactured and utilised in any great numbers.  In contrast to William Beech’s personnel file, there is certainly no evidence at all in TOSTEE’s service record to indicate that his design was officially recognised by the authorities.
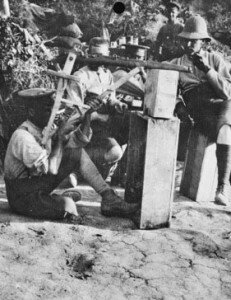
IMAGE LEFT:  Photo P02321.022 AWM (Australian War Memorial Collection) 347 Private (Pte) George Tostee (left), ‘E’ Company, 10th Infantry Battalion, demonstrates a periscope rifle he had invented to the battalion CO, Lieutenant Colonel Stanley Price Weir (right, with pipe in mouth), and other battalion officers.  Pte Tostee is using two boxes to show how a soldier could fire the device over the parapet of a trench without exposing himself to enemy fire. The mechanism is a homemade invention of boxwood and wire (this is possibly a mis-quote relating to Beech’s original prototype).  Born in Mauritius at San Julian, TOSTEE was a cook before the war.  His record shows ‘Reported for duty, transported from base’on the 21/05/1915  Gallipoli (two days after 19th May – when Beech created his prototype).   His name is incorrectly recorded as TOSTER on the First World War Embarkation Roll.
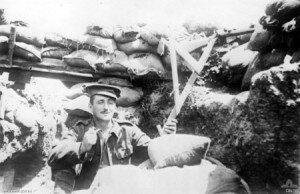
IMAGE RIGHT:  Australian War Memorial photograph number C01780 shows another image of a periscope rifle with the main timber support affixed to the pistol grip of the rifle, behind the trigger guard.  The photo was lent to the AWM by Lieutenant Jarvis.  It is described as an “Informal portrait of Lieutenant (Lt) Hubert Richard William Meager, 3rd Battalion, standing in a front line trench and holding a periscopic rifle. Lt Meager was killed in action at Lone Pine on 8 August 1915″. 

IMAGE LEFT:  AWM photograph, number P01580.013 Described as a photograph possibly taken at Steele’s Post (on McLaurin’s Hill, between Courtney’s Post to the north and German Officer’s Trench to the south).  Note how this particular periscope has the main timber support attached to the foreguard of the rifle, forward of the magazine.  Donor of the photo was P. BRAND.
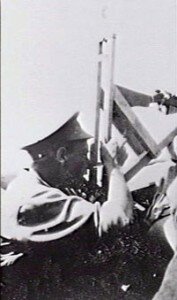
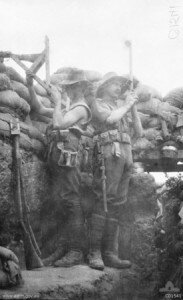
IMAGE RIGHT:Australian War Memorial photo number C01541 which shows a sniper team in action on Gallipoli during 1915.  The fact that one man has his shirt sleeves cut off would suggest that this photograph may have been taken in the summer period, circa August.  Credit-line for the photo belongs to Private Raynor.  The description states:- Standing in a trench, a sniper uses a periscopic rifle while his comrade observes for him through a periscope.

AN UNUSUAL VARIATION

There exists, significant photographic evidence to suggest that a well manufactured variation of the Beech Periscope Rifle was utilised during the Gallipoli campaign.  Very little information or documentation exists regarding who manufactured this style of device; or when it first came into service.  However, it is quite clear by the photographs below – this article was not simply made from “broken boxwood and wire”.  The upper framework is clearly made from a heavy gauge, metallic wire of  some description and somehow welded or fitted together to form the frame.  This is joined onto an angled timber body.  But of note is the wire portion which extends forward from below the rifle butt and joins to the foreguard of the rifle furniture (in front of the magazine).  This portion is clearly evident in the AWM photographs P03668.007 and P01336.003 which are featured below.
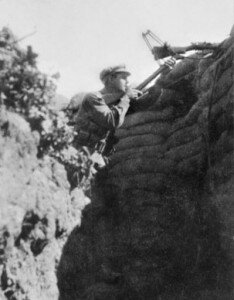
IMAGE LEFT:  AWM photo number H03493 showing the periscope of which components of the frame are manufactured using a ‘heavy gauge’ metal wire.  You will also note that the angled timber body has a type of rifle ‘butt’ arrangement so that the firer can hold the device in the same manner as he would a conventional rifle.  The AWM photo description states: Gallipoli, 1915.  An Australian soldier operating a periscopic rifle. He was firing at a Turkish sniper when this photograph was taken. (Donor Mr Lush)

There exists a document, written by Major-General James Gordon LEGGE Commanding  2nd Australian Division and dated the 8th of October, 1915.  Addressed to the Headquarters of the A & N.Z. Army Corps, it states …… “Herewith a type of periscope rifle invented by Corporal G. SEWARD.  It has been tried in the trenches and reported on as follows:- Superior to anything tried so far.  Requires small staples or eyeletson each side of small of butt for cable to work though.  Mirror might be so adjusted as to enable sights to be raised if required.  There should be less play in trigger release.  Claimed that there is better control over rifle in this patter than in former patterns.  Less exposure of rifle.  Method of adjusting top glass is an advantage.  Good method of trigger release”.  The fact that this report is very late in the campaign; coupled with the fact that every man in each photograph is dressed in a full tunic, may indicate cooler weather ….. giving proof to the idea that the images were taken during the autumn/winter months of September through to December of 1915 .
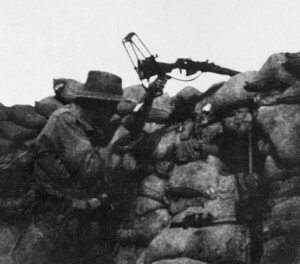
IMAGE RIGHT: AWM photo number P03668.007 clearly showing the metal wire frame and of note is the wire which extends from below the rifle butt to the foreguard of the rifle furniture.  Donor D Selleck.  The AWM Description states:- An unidentified soldier using a periscope rifle in a Lone Pine trench.  A homemade invention of mirrors, boxwood and wire, the periscope rifle allowed the user to sight and fire a rifle over the parapet without exposing himself to enemy fire.  (I believe that the description of “broken boxwood and wire” is a mis-quote …. referring by mistake back to the original prototype which was made by BEECH whilst still in the front line on the 19th of May at ’the Pimple’).
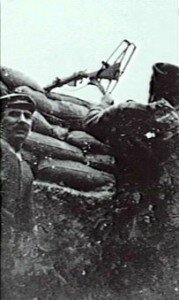

IMAGE LEFT: AWM photo number P01336.003 clearly shows how the wire frame was fixed to the rifle butt in a ‘clamp’ type arrangement.  I would be curious to study any plans in the manufacturing process of this particular style of periscope and who actually constructed the frames.  Undoubtedly there is a degree of engineering in this manufacturing process.  One would imagine that this type of work may have been performed by Naval tradesman on a board ship or by engineering personnel well away from the front lines.  It could also be imagined that the longevity of this particular design was much better when compared to that of an ‘all timber’ frame.  The timber joints would be prone to splitting under prolonged use, especially at the point where the hole is drilled to accommodate the fix-out screws; or if nails were used in lieu of screws.  (Donor F. GILSHENAN) 
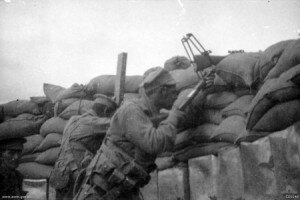
 

IMAGE RIGHT:  Another AWM photograph (number C01148) clearly showing how a “butt” type configuration has been devised so that the periscope can be placed against the shoulder of the sniper, like a conventional rifle.  This is the only photograph that I have seen which also clearly shows the lower mirror, fixed to the angled timber frame/body of the periscope … and through which the sniper takes his sight.   The reflection is then cast along the rifle sights, through the gap in the wire frame. Credit line Lent by Mrs Buckley.
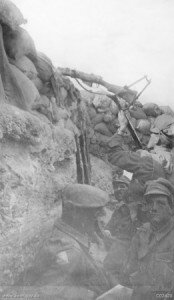
IMAGE LEFT:  AWM photograph number C02420 allegedly taken during September, 1915.  This photo is said to have been taken from a position in the trenches, somewhere on The Apex (on the seaward slopes of Chunuk Bair).  Credit line Lent by Lance Corporal P J Collins.

Another document in the form of a memorandum was located, which may in fact be a response to the letter by Major-General LEGGE of the 2nd Australian Division (mentioned above).  The letter is signed off by Brigadier-General Cyril Brudenell Bingham WHITE, General Staff, Australian & New Zealand Army Corps.  It states:- “Your N. 8/20 of 20th instant.  The following is an extract from the proceedings of the 5th meeting of the Inventions Committee:- An improvement particularly as regards trigger pull – has the defects of:- (i) Damaging the rifle by screw attachment.  (ii)  Rigid mirrors.  Recommended for commendation in orders but no further action in view of adoption of W.O. pattern.  The recommendations have not yet been confirmed by the Army Corps Commander.  Signed C.B.B. WHITE  Brig-General”.   This is the only document which the Medals Gone Missing Administrator has been able to find at present, which may pertain to the device pictured here.  Any information or input which may shed further light on this subject is most welcome.
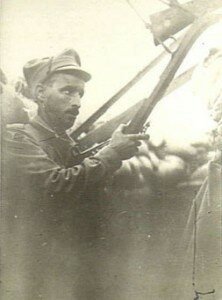
IMAGE RIGHT: Australian War Memorial photograph number G01002.  Of particular interest is the fact that this actual picture is credited to the official historian himself,  Charles Edwin Woodrow BEAN (C.E.W. Bean).  The AWM photograph description indicates that the photograph was taken during November 1915.  Unfortunately BEAN did not comment or elaborate on this variation in the design of the original periscope invented by William BEECH.  Nor did the Australian War Records Section appear to obtain a sample periscope for their inventory.  Subsequently, the Australian War Memorial does not appear to have an example of this metal periscope on hand in their collection of relics from the Great War.  It can only be assumed that all periscopes of this nature went with the AIF during the evacuation and accompanied the respective units to France, where they were used up in the process of the war.

PERISCOPE RIFLE USED IN FRANCE ON THE WESTERN FRONT
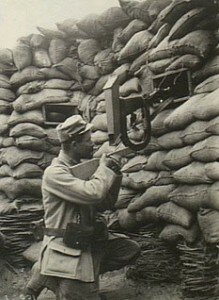
The image below shows the extent to which the periscope rifle evolved during the Great War.  This device, which incorporates a “box periscope” is obviously well manufactured and of a robust design.  Compared to the impromptu construction method first used by BEECH in the front line on the 19th of May, 1915 – this periscope was undoubtedly the pinnacle of design and materials.

IMAGE RIGHT:  Australian War Memorial number H04465 taken in the Aisne area, France circa 1917. A French soldier in a well sandbagged position at Pontaury using a rifle fitted with a periscopic sight. (Donor French Government)

A “MYTHBUSTERS” STYLE ROAD TEST OF THE BEECH PERISCOPE RIFLE
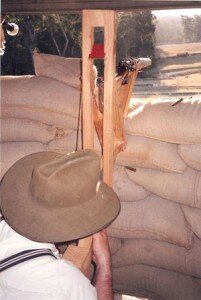
IMAGE LEFT:  The Medals Gone Missing Administrator constructed a Beech Periscope Rifle as a demonstration for the Batemans Bay .303 Commemoration Shoot (fundraiser) which ran for a number of years .  The target was set at 25 metres; to simulate the distance between trenches on the Gallipoli Peninsula during 1915.  The rifle proved very accurate with the fall of shot landing very close to the bull by most marksmen who tried the device.

A forum thread took place on the ALHA website (Australian Light Horse Association) a number of years ago, raising issue to the perceived “recoil” aspect of the Beech Periscope Rifle.  Having fired this device quite extensively during the S.S.A.A. .303 shoot, we could report back with some authority that any recoil experienced during discharge of the weapon was absorbed by the weight of the rifle/device.  The shooter experienced some rearward movement of the periscope when the round was discharged (with the shoulder of the shooter acting as the ‘pivot point’ for the rearward rotation) however the affects were certainly not severe.  Overall, I would estimate the recoil forces pushing against the shoulder of the marksman, to be approximately one third of the actual recoil force – when firing a .303 rifle from the shoulder in the conventional manner.
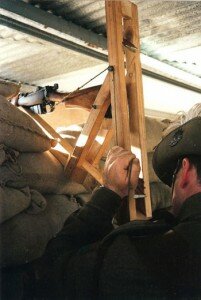
IMAGE RIGHT:  Photograph showing the method of trigger control for the reproduction ‘Beech Periscope Rifle’ at the Batemans Bay .303 Commemoration Shoot in 2004.  As can be seen, the operator is holding the frame in his right hand and the trigger pull is performed with the left hand.  On this model, the rifle “pull through” which is being used to operate the trigger has been fashioned onto a makeshift pulley system, so as to give a horizontal pull in terms of trigger movement.  Photos from Gallipoli however show the sniper pulling on a string directly coming from the trigger.
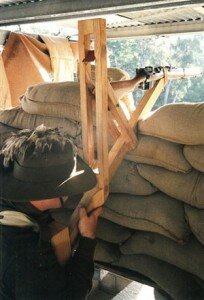
IMAGE LEFT:  Another angle showing the Beech Periscope rifle being used at the S.S.A.A.  Batemans Bay .303 Commemoration Shoot.  This “Beech Periscope Shoot” became a competition in itself at the Sporting Shooters Association of Australia endorsed event.  Competitors paid $1 AUD per shot on a winner takes all basis (however – being a fund raising event – winners often donated their proceeds back to the respective charity)
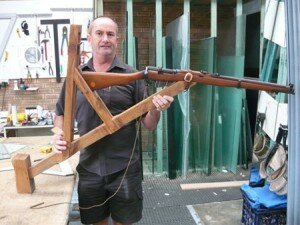
IMAGE RIGHT:  All About Glass proprietor Gary RIXON generously donated the mirrors required for the replica periscope rifle.  Regarding mirrors for this device, please see an extract authored by General BIRDWOOD. (see below).

In a letter from General Sir William BIRDWOOD to the Governor General of Australia during 1915,  the following extract testifies:-  “Our complete moral superiority over the Turk is partly due to the very clever invention of a man named Beech, who produced a periscope rifle.  When we got here we denuded the whole of our transports of their looking-glasses and made up some 2,000 periscopes on our little beach.  This man then made a very simple device.  The result is the Turk only sees the muzzle of a rifle coming over the parapet without anything behind it to shoot at and we understand from prisoners that he dislikes it intensely”.
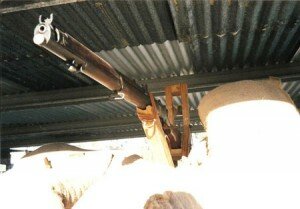
IMAGE LEFT:  The business end of a Beech Periscope Rifle.  With only this portion of the periscope rifle protruding above the parapet of the Australian lines, it is easy to see why this invention was disliked by the Turks as indicated in the extract above.  It provided the Australians with fire superiority – without giving the Turkish snipers the opportunity to shoot back and inflict casualties against the invader.
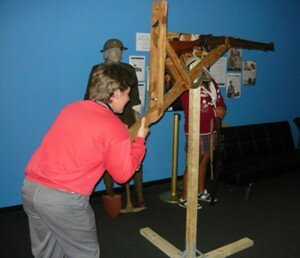
IMAGE RIGHT: It is samples of “engineering” such as this, which allow our younger generation to gain a valuable insight, as to how warfare was conducted by Australian and New Zealand troops (the ANZACS) during World War One.  A school student from Batemans Bay High School takes great interest in the ‘reproduction’ Beech Periscope Rifle.  

A small display was presented for the cinema goers at the premiere of the Australian film, “Beneath Hill 60″ in his local area.  This event was used to increase the public’s awareness for Legacy Australia and funds were raised for this very worthwhile cause.
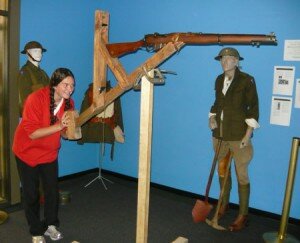
IMAGE LEFT:   Students were amazed by this device at the premiere of the film, Beneath Hill 60.  It is because of practical demonstrations like this that travelling exhibitions; such as those conducted by the Australian War Memorial – are so successful.

That say that necessity is the mother of all invention.  And Sergeant William Charles BEECH proved his practical intellect on the 19th of May, 1915 when so many of his new country men needed an answer to a problem.  But it is unfortunate that much of mankind’s creative genius has gone into devising ways to kill his fellow man. 

However, in 1915 ….. that was the situation the Allies and the Turks found themselves in and it is testimony to the fine spirit of our Turkish friends; that they do not bear a grudge against the nations who once came to their shores as ‘the invader’.   In 2015 …. 100 years on; during the Commemoration for Centenary of the Gallipoli landings – we will remember Sergeant William BEECH.   Lest we forget.

DO YOU WISH TO VISIT THE GALLIPOLI BATTLEFIELDS NOW OR IN 2015?  IF YOU WISH TO WALK THE HILLS AND VALLEYS & LEARN THE HISTORY FROM THE PEOPLE WHO KNOW …… THEN CONTACT GALLIPOLI HISTORICAL TOURS.  If the in-depth history supplied in this story is the sort of detail you expect from a Gallipoli Battlefield tour, then contact us.  We have escorted tours, led by experienced battlefield historians who live and breath the history.  Packages range from 3 days to 12 days.  And we are taking bookings now for the 100 year Anzac Day Commemorations.  Wish to know more?  Please Click Here.

  • Delicious
  • Facebook
  • Digg
  • Reddit
  • StumbleUpon
  • Twitter
Posted in Gallipoli, Honour Roll - Australian Stories, Military Medals, Military Memorabilia | Tagged | Leave a comment

French (Nazi Endorsed) Croix De Guerre Awarded to Vichy French Troops During World War Two

 The Croix de Guerre is one of France’s most prestegious decorations and was awarded for Gallantry in combat.  It has been awarded by both the French  and Belgian governments since 1915 to their countrymen and Allies alike, who have served with distinction on the battlefield.   Consisting of a maltese style cross with swords, the standard Croix de Guerre is suspended by a silk ribbon of alternating red and green coloured vertical stripes.

IMAGE RIGHT:  The traditional Croix de Guerre issued by the French Government during World War One.  Note that this particular medal ribbon has the alternating ‘red and green’ stripes from which the medal is suspended.  This particular medal was dated on the reverse ’1914-1917′.

However, this award went through a dark period of it’s history – when France became occupied by the Nazis of Adolf Hitler’s Third Reich.  As a result of the German takeover of France, a wartime government was based in the city of Vichy, south of Paris.   And as a result, the term “Vichy French” refers to a period in the history of France which many of her citizens consider to be a very bleak and unfortunate time in their long and proud saga.  This Vichy government existed between July 1940, until November of 1942; when the German regime finally took over the whole of France. 

IMAGE LEFT:  German troops marching through the Arc De Triomphe after the surrender of Paris on the 14th of June, 1940.  For the Frenchmen of both World Wars who fought for the freedom of their country, it was a heartbreaking moment.

Thanks to an Australian Militaria Dealer who sources very scarce and valuable war medals, one of the rarest types – of French CROIX DE GUERRE ever commissioned, has come into the hands of the Medals Gone Missing Administrator.   This particular Croix de Guerre, was commissioned during the German occupation of France in 1940.  

All French veteran’s who had been awarded a Croix de Guerre prior to the German invasion (and who were loyal to the newly formed Vichy Government) were required to exchange their ‘Republic’ awards in favour of the new ‘Vichy’ government type.  It differed from the traditional medal in that the red vertical stripes on the medal ribbon were no longer present; black stripes being substituted in their place.

IMAGE RIGHT:   The Vichey endorsed Croix de Guerre which was forwarded to Medals Gone Missing by an Australian Medals and Militaria Dealer.  Note that the ‘red’ vertical stripes of the traditional Croix de Guerre have been substituted for ‘black’ vertical stripes.

Of particular interest to Medals Gone Missing was the part played by the Vichy French forces in their defence of Syria in June and July of 1941.  (To read more about the part played by two different soldiers of the Australian 7th Division please click Harry KATEKAR and Con VAPP)

This extremely rare Vichy Croix de Guerre became prohibited after the war ended and was removed in accordance with the degree of 7th January, 1944. 

Still in it’s original cardboard box of issue, this extremely rare French Medal is in very good condition - with the scarce ‘ Palm Leaf Gallantry Citation ‘ attached to the ribbon.  Instituted on the 28th of March 1941,  it has the same design features as the earlier 1939 type with the exception that the reverse shows the inscripted date of 1939/1940.  The black edging to the ribbon with five alternating black stripes, was only awarded from 1941 until the liberation of France by the allies in 1944.  It was proudly worn by French Vichy soldier’s serving in the French colonies, including members of the French Foreign Legion serving on the Russian Front.  Pétain and the Vichy regime willfully collaborated with German Forces; whilst their exiled countrymen served in the “Free French” forces on the side of the Allies.

IMAGE LEFT:  The reverse side of the Vichy French Croix de Guerre, showing the date of award – being 1939 to 1940.

It is a little known fact that Germany allowed a well armed, Vichy French Army to exist whilst it occupied France during World War Two.  Set at 3,768 officers, 15,072 non-commissioned officers, and 75,360 men – it was known as the “Vichy French Metropolitan Army” until the liberation of France in 1944.  All Vichy French personnel serving in the forces had to be volunteers.  In addition to this army, the size of the paramilitary Gendarmerie was fixed at 60,000 men; plus an anti-aircraft force of 10,000 men.  A Vichy French Colonial Force about 145,000 strong, was  divided up amonst her colonies including the  Mediterranean area, Morroco, Algeria, and the ” Army of the Levant” in Lebanon and Syria.  All up, a total Vichy armed force of some 309,200 men serving in Army, Anti-Aircraft Forces and Police.

While Marshal Philippe Pétain was Chiefe of State of Vichy France and collaborated with the Germans, Charles de Gaulle claimed to incarnate the legitimacy and the continuity of France.  Following the liberation of France after Operation Overlord, de Gaulle proclaimed the Provisional Government of the French Republic (GPRF) in June 1944. After the Liberation of Paris in August, the GPRF installed itself in Paris on August 31. The GPRF was recognized as the legitimate government of France by all the allies on October 23, 1944.

Several versions of of this cross exist:

1: dated 1939-1940 with flat topped 3 on reverse (Offical Paris Mint)
2: dated 1939-1940 with round topped 3 on reverse (Private Contractor to Vichy)
3: dated 1941
4: dated 1942
5: dated 1943
6: dated 1944
7: dated 1944, observe “la Republique” and legend replaced with the Francisque and the legend; ETAT FRANCAIS.

Medals Gone Missing Administrator would like to thank the Militaria Dealer who generously supplied the images and content of this story.

  • Delicious
  • Facebook
  • Digg
  • Reddit
  • StumbleUpon
  • Twitter
Posted in Military Medals | Leave a comment