KUTTABUL COMMEMORATION PROJECT 1942 – 2012 70th Anniversary of the sinking of H.M.A.S. Kuttabul in Sydney Harbour

Tweet

An advertisement for the KUTTABUL COMMEMORATION PROJECT 2012 appeared in the RSVP section, page 23 of The Sydney Morning Herald on Saturday 5th of February, 2011.  The snippet calls for the contact details of any relatives/descendants of the crew who were aboard the converted ferry HMAS KUTTABUL on the evening of the 31st May/01st June, 1942 when the vessel was sunk by a torpedo, fired by a Japanese Midget submarine.

The story in full, reads as follows:- SEEKING RELATIVES OF SERVICEMEN.  In May and June of 1942 the war was brought home to Australians on the east coast when the Japanese attacked Sydney Harbour from the sea.  Next year will be the 70th Anniversary of the attack by midget submarines on the Imperial Japanese Navy on Sydney Harbour.  The Kuttabul commemoration project (see ww2australia.gov.au/underattack/sydharbour.html) is seeking survivors, or descendants of servicemen, present during the attack.  Contact project manager Gary Traynor at or 0449 692 401.

IMAGE ABOVE:  The snippet from The Sydney Morning Herald which appear in the RSVP section on Saturday 5th February, 2011.  Please click on the image to enlarge.

As a result of the story, we were successful in making contact with HMAS Kuttabul survivor, Able Seaman Neil Frederick ROBERTS (Service Number S5973) who was onboard the vessel when she was struck by the Japanese torpedo. Also, the family of Stoker 2nd Class Herbert Arthur SMITH (Service Number S6131) who sadly lost his life as a result of this attack.

This event is planned to bring attention to the work performed by Legacy Australia in caring for the families of our servicemen and women and will be held on the 1st of June, 2012.  Medals Gone Missing Administrator Gary Traynor would like to thank the Sydney Morning Herald and Sydney based web designers, Quantum Web Solutions for their ongoing support in this worthwhile cause.

For further reading, please Click Here to view our original post in relation to HMAS Kuttabul.

  • Delicious
  • Facebook
  • Digg
  • Reddit
  • StumbleUpon
  • Twitter
Posted in Honour Roll - Australian Stories, Military Medals | Tagged | Leave a comment

A Digger Twice Over – Corporal William John McDonald M.M. and the Second Tunnelling Company AIF

Tweet

CORPORAL WILLIAM JOHN McDONALD
640 – 2nd Tunnelling Company

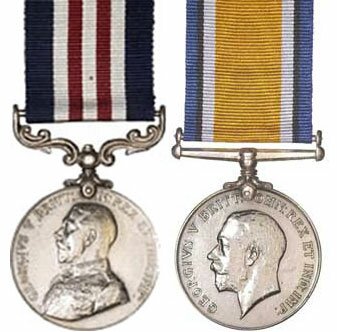
IMAGE LEFT:  The Military Medal and British War Medal of Corporal William John McDONALD are missing.  His South Africa Service medals are also lost to his family.  Can you help?

William John (William James Grant) McDonald was born at Inverness, Scotland about July 1877, the son of James Grant, diver, and Celia Alexander (nee Nelson) McDonald, arrived in Melbourne around 1902.

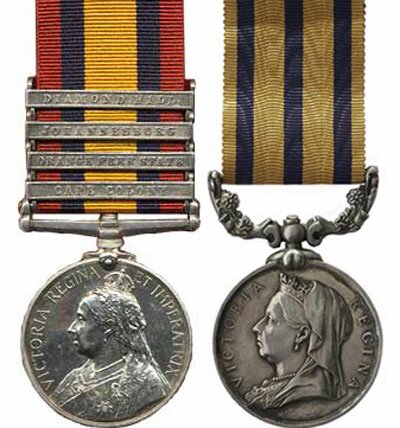
Long before the simmering pot which was Europe boiled over into the Great War, William found himself in a war zone.  The British were at war with the Boers in South Africa and William would see service with Brabant’s Horse.  This force was a British South African Irregular unit of some repute. Cape Colony and Natal were British colonies (much like NSW and Victoria in Australia) and like Rhodesia, were on side of the British side.  Brabant’s Horse was similar to any of the Australian Mounted Rifle units and indeed from time to time, was brigaded with the Australians.  Serving with this unit, it is believed that William was entitled to the Queens South African medal (QSA) with 4 clasps.  These clasps being:- Cape Colony, Orange Free State, Transvaal and South Africa 1901.   Further to this entitlement, it is believed that he was entitled the British South African Company medal for Rhodesia with the clasp 2nd Matabele Campaign. This medal had been approved by the British Government and Queen Victoria and according to this, is essentially an approved decoration.  The BSAC essentially owned Rhodesia and was a ‘Government ‘ in its own right under the crown. 

IMAGE RIGHT:  The Queen’s South Africa Medal (Q.S.A) and the British South African Company Medal 1890 – 1897 believed to have been awarded to William John McDONALD for his service in South Africa and during the Boer War.

After his service in South Africa, William married Harriett Louisa Quinton in Melbourne on the 25th of August, 1904 and settled in the suburb of Richmond. Harriett had a child named Percy Edward Quinton in 1902, from a previous relationship  and William took him on as his own.  Sadly, the first attempt by William and Harriet to have their own children end in partially in tragedy.  Giving birth to twins on the 19th November, 1904 – one child christened “Benjamin James” died on the first day.  His twin sister however, named “Violet Elizabeth” was fit and healthy and survived till she was 93 yrs old.  By 1914 the couple were supporting seven children.   Then from 1906 to 1919 they have another 7 children.   8 all up;)

William was in possession of a letter dated the 15th of August, 1914 from the Honorary Secretary of the South African Soldiers’ Association of Australia addressed to a Captain Lyons (Supply Officer) of Broadmeadows Army Camp.  The letter advised that William was an experienced Army cook and in urgent need of employment.  It was requested that some form of employment be found for William in the new AIF being formed.   Captain Lyons forwarded the letter on to a Major Holdsworth with the notation “Can you let this man in?”

Major Holdsworth duly enlisted William in the Australian Imperial Force (A.I.F.) on the 18th of August 1914 at Melbourne, Victoria.

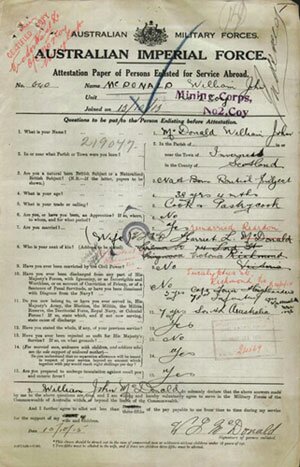
IMAGE LEFT:  The Attestation Form of Private William John McDONALD upon his original enlistment into the Australian Imperial Force.

He signed the ‘Attestation Paper of Persons Enlisted for Service Abroad’ and the Oath to ‘well and truly serve’ on the 21st of August.  A medical examination on same day had found him to be ‘fit for active service’ and recorded that he was 38 years and 2 months of age, standing 5ft 5ins tall and weighing 9 stone 3 lbs.   He had a dusky complexion, blue eyes and brown hair.  William’s trade was listed as ‘cook’ and that he was a good horseman.

He named as Next-of-Kin; his wife Mrs Harriet Louisa Jane McDonald of 162 Mary Street, Richmond, Victoria and recorded previous military service as:
7 years with 78th Infantry Battalion, South Australia, attaining the rank of Corporal.  He also claimed 2 years with the 2nd Brabant’s Horse in South Africa (number 20178 from the 31st of October 1900 – discharged on the 15th of May, 1901) and 8 Years with the Cape Highlanders.

William also recorded 1 year of service in the Matabele War in 1896 as a Trooper with “A” Troop, AfriKander Corps.  Based on this, William was a very experience campaigner indeed.

Recruited into the Head Quarters Company, Divisional Train, Australian army Service Corps; William served as a Private soldier with the service number 352 and embarked from Melbourne on 19 October 1914 on board HMAT A 24 Benalla for the Middle East.  Like many soldiers in these times, William somehow transgressed whilst in Suez and was awarded 24 hours detention as a result.

William was admitted to 15 General Hospital in Alexandria on the 15th of June 1915 and was transferred by Hospital Train to Cairo the following day.  He was admitted to Abbassiah Hospital on this  same day, being the 16th of June.

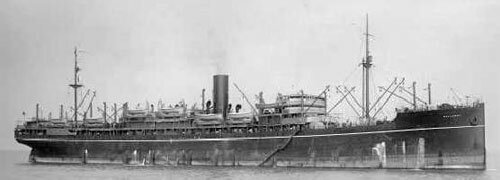
IMAGE RIGHT: William returned to Australia on board the Hospital Ship Ballarat, leaving Cairo on the 3rd of July and arriving in Australia on 6th of August, 1915.  After sometime in the Langwarrin Hospital, he was returned to Melbourne and discharged from the A.I.F. on the 8th of  October, 1915.  HMAT (His Magesty’s Australian Transport) Ballarat which conveyed William back to Australia before his first discharge from the AIF.

Not wasting any time, William again enlisted into the A.I.F. just one week after his discharge, on the 15th of October 1915.  He signed his ‘Attestation Paper’ and the Oath for the second time and began training with the 24th Depot Battalion.

His details this time were recorded as 38 years and 4 months of age, 5ft 5ins tall, weight 9 stone 6 lbs, medium complexion, blue eyes and dark hair.  Tattoos on both forearms and a scar above his right eye were recorded as distinguishing marks.

He again named his wife Mrs Harriet Louisa McDonald as his Next-of-Kin, recording her address as 74 Lord Street, Richmond, Victoria, and allotted three-fifths of his pay for the support of his wife and 7 children.

On the 6th of  November he was appointed to No.2 Company of the newly formed Australian Mining Corps and trained with them at their Casula Camp until he embarked on Ulysses for the European theatre.

Following a farewell parade in the Domain, Sydney, the Australian Mining Corps embarked from Sydney, New South Wales on 20 February 1916 on board HMAT A38 Ulysses.  The Mining Corps comprised of 1303 members at the time of embarkation with a Headquarters of 40; No.1 Company – 390; No.2 Company – 380; No.3 Company – 392, and 101 members of the 1st Reinforcements.

HMAT Ulysses arrived in Melbourne, Victoria on the 22nd of  February and the Miners were camped at Seymour while additional stores and equipment were loaded aboard.  Departing Melbourne on the 1st of March, Ulysses sailed to Fremantle, Western Australia where additional members of the Corps were embarked.  However the ship grouned on an “unchartered rock” whilst leaving Fremantle, resulting in a delay of about one month.   The Mining Corps sailed for the European Theatre on the 1st of April 1916.  By this time, the men on board had nicknamed her ‘Useless’.

The ship arrived at Suez, Egypt on the 22nd of April, departing for Port Said the next day; then on to Alexandria.  The Captain of the ship was reluctant to take Ulysses out of the Suez Canal because he felt the weight of the ship made it impossible to manoeuvre should a submarine attack occur.  The Mining Corps was subsequently transhipped to B1 Ansonia for the final legs to Marseilles, France via Valetta, Malta.  Arriving at Marseilles on the 5th of May, most of the men entrained for Hazebrouck where they arrived to set up their first camp on the 8th of May 1916.

A ‘Mining Corps’ did not fit into the British Expeditionary Force structure, and the Corps was disbanded and divided into three Australian Tunnelling Companies.  The Technical Staff of the Corps Headquarters, plus some technically qualified men from the individual companies, were formed into the entirely new Australian Electrical and Mechanical Mining and Boring Company (AEMMBC), better known as the ‘Alphabetical Company’.

On the 3rd of July, 1916  William was admitted to the 1st New Zealand Ambulance with lumbago and was transferred to No.5 Canadian General Hospital at Boulogne with gastri-enteritis on 5th  July.  He was evacuated to England on the 6th July and admitted to the No.3 Camp Hospital at Harefield the following day.

Discharged from Hospital to No.1 Command Depot, Perham Downs on 9 August he was granted furlough, returning to Perham Downs on the 30th of August.

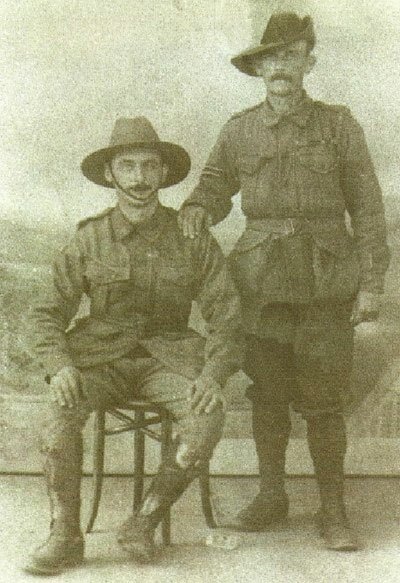
IMAGE LEFT:  Photograph of Corporal William John McDONALD (standing on the right) with an unknown soldier.  As he did not receive his second stripe until the 1st of September, 1916 – it is obvious that this photograph was taken after this date.

He was promoted Corporal on the 1st of September, 1916 and transferred to the 2nd Australian Tunnelling Company.  On the 21st of September, William proceeded overseas to France, marching into the 2nd Australian Divisional Base Depot at Etaples. He joined the 1st Anzac Entrenching Battalion on 16th October.  He was then attached to the 1st Canadian Tunnelling Company on the 26th of October and was wounded in action whilst attached to this unit on the 13th November, receiving a shell wound to the face.  As a result of this wound, he was admitted to the 4th London Field Ambulance and discharged back to his unit on the 16th of  November.

On 29th of  November he was admitted to the 41st D.B. Station for dental treatment and returned to duty on the 12th of December.  He rejoined the 1st Canadian Tunnelling Company on 12th December and on 17th December he was admitted to the 2nd Casualty Clearing Station with bronchitis; and was not discharged to duty until 18 January 1917.

On the 4th of December his Next-of-Kin was advised that he had been wounded.  The letter was sent to Mrs. H.L. McDonald, Wiloma Street, Ringwood, Victoria.
On 31st of January 1917 he was taken on strength of the 3rd Australian Tunnelling Company from the 2nd Australian Tunnelling Company.  The 3rd Company was working in the Hill 70 Mining System constructing fighting points in the Support Trenches and extending tunnels in the mainly hard chalk Gordon and Cameron workings.  During the short time he was with them, the Company lost 5 men to enemy action.

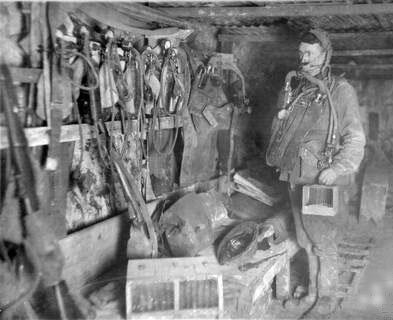
IMAGE RIGHT:  A mine rescue station belonging to the 3rd Tunnelling Company at Hulluch Tunnels near Loos in January 1918.  This is around the time that William was attached to the unit which was involved in extensive tunnelling activity.  It is believed that William may have worked as a miner in Rhodesia and thus, this could be a reason why he was recruited for the tunnelling company.

On the 18th of February, William was transferred and taken on strength of the 2nd Australian Tunnelling Company.  On the 4th of April 1917 it was recorded that his Next-of kin address had changed to 69 Chestnut Street, Richmond.

On the 26th June he was admitted to 2nd Field Ambulance with NYD (not yet diagnosed), rejoining his unit on the 4th of July. Within a matter of days, the 2nd Company was moved to the Nieuport-Bains region to prepare the area for a major British attack on the area.  The area they were working in was heavily shelled on 10th July and more than 4o of the Australian Tunnellers were taken prisoner.
[see Western front/2nd Australian Tunnelling Company/Nieuport-Bains Affair on this site]

William was admitted to 28th Field Ambulance on 10th of November, 1917 with ‘NYD Chest’ and on 15th November he was transferred to the 13th General Hospital at Boulogne with bronchitis.  On 17th November he was evacuated to England on the Hospital Ship ‘Jan Breydel’ and admitted to Connaught Hospital, Aldershot with bronchitis, slight.  On 19 December he was transferred to the 3rd Auxiliary Hospital at Dartford and was discharged to furlough on 20th of December, 1917.

He reported to Hurdcott on the evening of 4th January 1918, one day later than he had been directed to and was charged with being absent without leave for that day.  The offence earned him a reprimand and the forfeiture of 2 days pay.

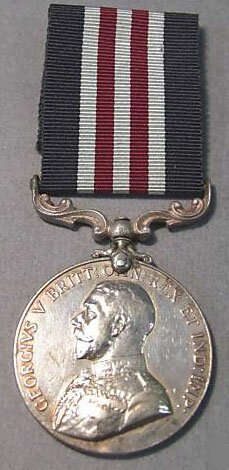
IMAGE LEFT:  The Military Medal (M.M.) as awarded to William for his actions in France.

On 8 February, 1918 he was awarded the Military Medal for bravery in the field.  No record can be found of the recommendation for this award, but it is believed that it may be related to the Nieuport-Bains Affair.

William left England 12th of March, 1918 on board the Kenilworth Castle transhipped to the Field Marshall at Durban on 28 April, arriving in Australia 22nd May, 1918.  His documents record that he had been gassed.

He was Discharged from the A.I.F. at Melbourne on 13 July 1918 – ‘medically unfit – disability – gassed’, entitled to wear the 1914/15 Star, the British War Medal and the Victory Medal alongside his Kings and Queens South African Medals for his service in the Boer War.

On  the 19th of July 1918 he was advised that the award of the Military Medal had appeared in the London Gazette, Second Supplement, No. 30507 dated 1st February 1918, and had also been promulgated in the Commonwealth of Australia Gazette No.95, dated 27 June 1918.

William John McDonald died on 12 April 1921 at the Austin Hospital, Melbourne of Pulmonary Tuberculosis.  He was 43 years of age.  He was buried in the Box Hill Cemetery on 14th of April, 1921 and lies at rest in a grave for life with his wife Harriett, Harriett’s second husband George Reardon, his son Thomas and his daughter Violet.

Williams’ 1914/15 Star was received by his widow on 23 June 1920, his British War Medal on 16 June 1921.

In December 1924, the Repatriation Commission, Melbourne, sought advice on the current address of Williams’ widow, as a letter addressed to her 441 Church Street, Richmond address had been returned.

In January 1925 Williams’ Victory Medal was issued to his widow, since re-married and now Mrs. H. L. Reardon of 441 Church Street, South Richmond. In August 1925 his particulars of service were provided to the Repatriation Commission.

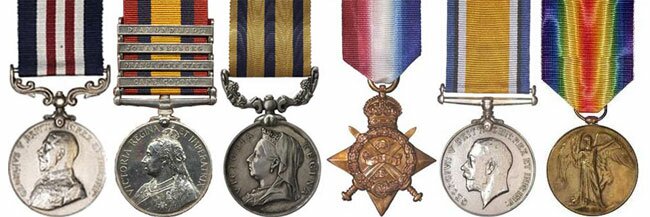
IMAGE RIGHT:  The Military Medal, the Queens South Africa Medal (QSA), British South Africa Company Medal 1890 – 1897, 1914-1915 Star, British War Medal and Victory Medal as awarded to Corporal William John McDONALD.  Whilst it is not confirmed, this is believed to be his full entitlement.

In June 1967 Williams’ son Reginald applied for the Gallipoli Medallion in respect of his father. He completed the formal application in July 1967.

As stated, William’s Military Medal , QSA (Queens South Africa Medal) British South Africa Company Medal 1890 – 1897 and British War Medal are missing and his descendants would dearly love to locate them so that they can be re-united with his other war medals.  If you could help this family, they would be most appreciative.  Please contact the Medals Gone Missing Administrator if you can help.

This story was composed by © Donna Baldey 2010
with the assistance of Erin Ritters, great granddaughter of William McDonald.
It was reproduced on the Medals Gone Missing website by courtesy of Erin Ritter.

  • Delicious
  • Facebook
  • Digg
  • Reddit
  • StumbleUpon
  • Twitter
Posted in Honour Roll - Australian Stories, Military Medals | Tagged | Leave a comment

For King And Empire – Thomas Edward Jones Of The Durham Light Infantry

Tweet

When the Britain braced for war in the months leading up to August of 1914, many a lad would take into serious consideration – which branch of the service he would enlist if England was to be drawn into a European conflict.

However, many Britons were already serving in the armed forces; well before their country declared war against German on the 4th of August.  One such soldier was Private Thomas Edward JONES of the Durham Light Infantry.  Born in the town of ‘Bishop Aukland’ in the County of Durham on the 14th of December, 1889 – it was inevitable that Thomas would serve with the unit which became synonymous with his County of birth.

IMAGE RIGHT:  For King And Empire – Services Rendered.  This badge was presented to Sergeant Bugler Thomas Edward JONES of the Durham Light Infantry as a result of his service in His Magesty’s Armed Forces.  Whilst the war medals originally issued to Thomas are missing from the family, they have both the original ’King & Empire’ badge and the certificate that came with it. 

Thomas enlisted with the rank of Private into the 2nd Battalion of the Durham Light Infantry on the 12th of February, 1907 at the youthful age of 18 years and 2 months.    His great nephew, Jason Renshaw who resides in Australia was informed that Thomas had spent some time on garrison duty in Cork, Ireland prior to the First World War.  This period may amount to a portion of the “3 year period of overseas service” recorded on his original parchment enrolement papers.   

According to the original documents held by the descedants of Thomas Edward JONES, it is evident that he transferred from the 16th (2nd Reserve) Battalion to Class “V” Army Reserve on the 26th of July 1916 after serving with the colours for 1 year and 11 months.  The transfer to Army Reserve being completed on the 31st May 1917 at Colchester.

IMAGE LEFT:  Sergeant Thomas Edward JONES with his wife Sarah Jane (OUGHTON).  Sarah was born on the 18th of March, 1891 in Sacriston in County Durham and married Thomas Edward JONES on the 17th of December, 1909.

Thomas married Sarah Jane OUGHTON in England where they raised a family.  However, when most of her children emmigrated to Australia,  it has been said this affected Sarah greatly and that she died of a “broken heart” on the 23rd of May, 1959.  Upon losing his wife, Thomas then came out to Australia to be with his children.  It can safely be assumed that as Thomas brought with him; all of his Army documents and War badge …. then he would certainly have brought his war service medals with him as well.   It is a regular occurrence – that First World War medals awarded to Britons during the Great War; would be re-located to Australia or other parts of the globe as a result of emmigration.

The late Harrison Oughton JONES was the third born son of Thomas.  Harrison who also served with the Durham Light Infantry in the 1st Battalion, saw active service in China, North Africa, Palestine, Malta, Kos, France, Belgium and Germany during World War 2.  Jason RENSHAW is the grandson of Harrison and great-grandson to Thomas Edward JONES. Jason indicates that before Harrison passed away, he gave three miniature World War 1 medals to Maurice Jones (the last remaining son of Thomas Edward).   The message passed on with this miniature First World War trio was that the medals in fact, belonged to Thomas.   Naturally, these miniatures consist of the 1914-1915 Star, the British War Medal and the Victory Medal.   However, no mention was made as to the location of the ‘full size’ missing war medals and it is hoped that these awards are out in the collector world; hopefully to be re-united with the descendants of Thomas Edward JONES.  Can you help?

IMAGE RIGHT:  The incomplete medal card of Thomas Edward JONES. Whilst the card does not specify which medals have been awarded to Thomas, it does in fact record his rank as being “Bugler Sergeant” and his attachment to the 6th Battalion of the Durham Light Infantry.

Some confusion was experienced by the descendants of Thomas as his original medal card shows no medals at all were awarded.  However, like many other service records that were kept on hand by the British authorities, it appears that the service records of Thomas Edward JONES were destroyed by fire during World War 2.

Searching for a missing war medal set belonging to a common surname, such as “Smith” or “Jones” can be like searching for the veritable ‘needle’ in a pile of needles.   However, with the ever increasing trade in war medals on ebay and other such auction sites taking place – there is always hope that the medals will eventually turn up on the open market.  

And Medals Gone Missing asks that all of you collectors out there, consider the possibility that one day …… a descendant of a serviceman or woman, which you hold in your collection – may seek for a return of the medals.  It will only be through your act of extreme kindness; that will make this possible.

IMAGE LEFT:  An image of the First World War trio, consisting of the 1914-1915 Star, British War Medal and Victory Medal; similar to what was awarded to Sergeant Thomas Edward JONES for service during the Great War.
THESE WAR MEDALS ARE MISSING !  CAN YOU HELP ?

  • Delicious
  • Facebook
  • Digg
  • Reddit
  • StumbleUpon
  • Twitter
Posted in Honour Roll - British Stories, Military Medals | Tagged | Leave a comment

Do You Know George Green of 16 Hope Street, Southport – England Who Lived here During World War One?

Tweet

Do you know George GREEN who lived at 16 Hope Street, Southport in England during World War One?  If so, we are seeking to make contact with him or one of his descendants.

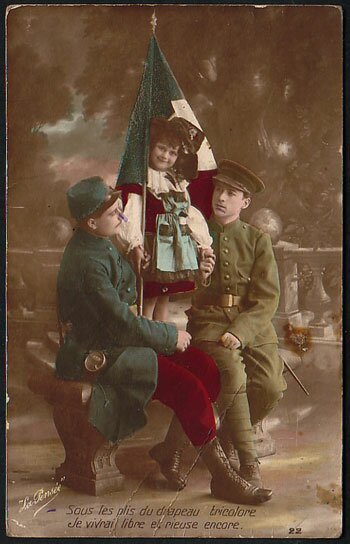
Medals Gone Missing have recently purchased a First World War postcard from ebay. The card was sent by a British soldier to his son, ‘Master George Green’ sometime during the Great War.  The card itself is a wonderful photographic print, which depicts two Allies – a French soldier and a British soldier, protectively flanking a young girl who is holding the French flag.   Whilst the image is essentially a sepia print photograph, the original of the image has been ‘hand painted’ and shows the French soldier adorned in his traditional red coloured breeches with grey/blue tunic.  The English soldier of course, is wearing his khaki coloured woollen tunic and trousers, complete with a visored cap and puttees.

IMAGE RIGHT:  The postcard, showing a French soldier and a British soldier, seated alongside the young French girl.  Patriotic images such as this, simply reinforced that the British and the French ….. once sworn enemies from the Napoleonic era ….. were now united Allies; fighting a common foe.  Note the ‘graffitti’, presumably done by a young George Green. 

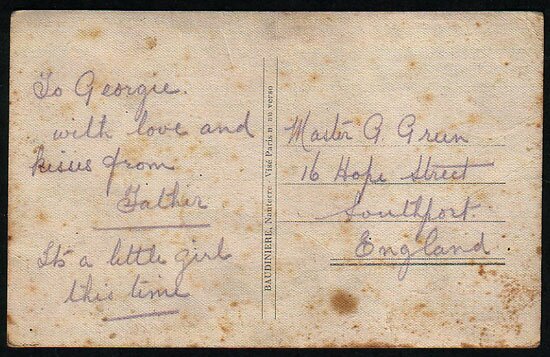
The reverse side of the postcard shows the handwriting of the author; the father of young George GREEN. This soldier has obviously written the postcard whilst away from home; possibly whilst on deployment in France as you would expect from the subject matter.  The card is addressed to Master G. GREEN of 16 Hope Street, Southport in England.  The script on the card states:- to Georgie with love and kisses from Father.  It’s a little girl this time.   One can only assume from this last comment, that his father had previously sent a postcard with the image of a young French boy?

As little boys do, some pen marks or ‘graffitti’ have been applied to the front of the card; namely on the nose of the French soldier and the chin of the British soldier.  Perhaps young George was scolded by his mother for defacing the images like this.  I would love to be able to locate George and ask him !!

IMAGE LEFT:  The handwriting of a loving father, to his son George Green of Southport – England.  If you are a descendant of George Green who lived at 16 Hope Street, then Medals Gone Missing would dearly love to hear from you.  There is no greater sense of satisfaction than returning such items of militaria to it’s rightful family.

If Master George GREEN is still alive, he would be a very ripe old age indeed.  The Medals Gone Missing Administrator is seeking any descendant of “young” George with the view of returning this piece of Great War history to it’s rightful owner.

Whilst the postcard was purchased for a very small price – the princely sum of $5 AUD …… small tokens of a father’s love, such as this - are priceless !   And the Medals Gone Missing Administrator would like to remind our readers that it is not simply missing war medals; that are the focus of our ‘non profit’ organisation.  We are constantly purchasing small items such as this, in the hope that one day – they will be returned to their respective family.

I sincerely hope that the father of George Green survived the war, to see his young son grow up.  Without a first name, or even an initial …… it is near impossible to find out the fate of George’s father.  A search of the Commonwealth War Graves Commission records indicate that thousands of men by the surname of GREEN, tragically lost their life during the First World War. 

The sad fact is, it is highly possible that George grew up to fight his own war from 1939 through to 1945.

FOOTNOTE: If one of our FRENCH readers could kindly translate the inscription on the bottom of the card, we would appreciate it.

RESULT: My thanks to one of our readers, Rick Christopher who provided the translation:- “I will live free and happy again under folds of the triclour flag”.

  • Delicious
  • Facebook
  • Digg
  • Reddit
  • StumbleUpon
  • Twitter
Posted in Honour Roll - British Stories, Military Medals | Tagged | 5 Comments

Lieutenant Baillie Chisholm Munro, Military Cross, The Kings Royal Rifle Corps at the Nieuport Beach Party

Tweet

Baillie Chisholm MUNRO came from humble beginnings.  He was the grandson of carpenter William MUNRO and Margaret CHISHOLM, who moved to Bettyhill, Sutherland in Scotland shortly after marrying at Kilmuir-Easter, Ross and Cromarty in 1830. William was innkeeper at Bettyhill where he and Margaret had four children, with son William following in his father’s footsteps as the local innkeeper. He married Annie Gordon MacLeod, and they had six children including Baillie Chisholm MUNRO who was born at Bettyhill about 1884.

Baillie and his brother Donald MacLeod MUNRO emigrated to Rhodesia, and another brother John, emigrated to Canada, becoming a barrister at Saskatoon prior to the outbreak of war. Donald MacLeod Munro died on the battlefields of Southern Rhodesia on 14th November 1910, but it is not known if Baillie was involved in that conflict. Baillie travelled on the ‘Norman” from Durban to London, arriving on 4 November 1914, three months after Britain declared war on Germany. He travelled as 30 year old engineer Baillie C Munro, whose country of last permanent residence was Rhodesia, and country of intended future residence was Scotland. He enlisted with the Kings Royal Rifle Corps at London on 18th November 1914 with the rank of Private, and after just one month of training boarded a troopship to France on 21 December 1914.

IMAGE LEFT: Hat badge of The Kings Royal Rifle Corps.  Enlisting and embarking for active service in 1914, Baillie was one of the original Battalion members who would answer the call for Britain.  As can be seen by the inscriptions emblazoned on their hat badge, the K.R.R.C. already had a very proud and distinguished battle record.

According to one report Baillie was wounded in action during March of 1915, but his injuries couldn’t have been too serious as the “Supplement to the London Gazette” dated 27 July 1916 awards him the Military Cross, and a later edition, reproduced below details the specific acts for which the award was granted. The Gazette doesn’t give a location, but the award may have related to an earlier incident at High Wood or Wood Lane at the Somme, as the major offensive commenced there on 14 July 1916, with Baillie being mentioned in dispatches on 9 September 1916 after the award was granted.

IMAGE RIGHT:  Supplement to the London Gazette for the 19th of August, 1916 showing the citation for Baillie’s Military Cross.

The following is an extract from the account by Major-General Sir Steuart HARE titled “The Annals of the King’s Royal Rifle Corps, Vol. V, The Great War”, and details the 9th September 1916 attack on Wood Lane:  “On the XV Corps front the 1st Division attacked in High Wood and Wood Lane, a trench running south-east from the edge of the wood. The 2nd Brigade attacked this trench and a part of the wood. Our 2nd Battalion, in the command of which Major R.N. Abadie had succeeded Major Atkinson, attacked on the right, with the 2nd Royal Sussex on their left, and the 1st Northamptonshire beyond them in the wood. The attack was a brilliant success, and casualties were moderate as things went on the Somme. To quote the ‘War Diary’: ‘At 4:45 p.m. our artillery opened an intense barrage on Wood Lane, and at the same time our men went over the parapet. The assault, which was delivered with much dash, was quite successful on the left. Here C Company carried their objective without any great effort or much loss. On the right D Company was held up by machine-gun fire, and the two platoons of B Company who were to support the attack on this flank were also stopped. Sergeant-Major Hyde was killed while endeavoring to lead forward the men of B Company. A fresh attack was organized on this flank. Stokes mortars and Lewis-gun fire subdued the enemy’s resistance, and on the threat of assault the remainder of the Germans surrendered. Their machine guns and the teams that had fought them had been put out of action by our Stokes mortars, and by 2nd Lieutenant Munro’s fire from a Lewis gun. The remains of D Company (every officer of whom had been hit), supported by B Company, then carried their objective. Connection was established with the 5th King’s Liverpool Regiment on the right, and with C Company on the left. C Company at the same time was in touch with the 2nd Royal Sussex, so that the whole line was firmly established in Wood Lane. The remainder of the day and the whole night were occupied in consolidating these positions.’ “Next day the captured line having been turned, and being lightly held by posts and Lewis guns, the enemy began to shell it heavily, and parties of them were continually seen crossing the front into High Wood, in which, evidently a counter-attack was being prepared. Our artillery put down a heavy barrage on the wood, and the attack never developed. On the night of the 10th/11th the Battalion was relieved by the New Zealanders. The Battalion lost 2nd Lieutenants A.E.M.A. Hawke and A.H.B. Langton, both of whom died of wounds, and Captains F.G. Fison, L.A. Blackett, 2nd Lieutenants J.W.D. Sneddon, B.C. Munro, J.H. Lee, C.W. Beadel, wounded. The casualties among other ranks were 24 killed, 82 wounded, 36 missing. The Battalion took 59 prisoners and two machine guns.”

IMAGE LEFT:  A Military Cross, as awarded to 2nd Lieutenant Baillie Chisholm MUNRO.

Major-General Sir Steuart Hare may have been quoting from this War Diary extract for the same day: “9th September 1916 – Orders arrived that the attack would take place at 4.45 pm. During the morning ‘A’ Coy. was relieved by ‘D’ Coy. and ‘B’ Coy. moved up into close support in SEAFORTH TRENCH some 50 yards away from out front line. ‘A’ Coy. went into RIFLES TRENCH in the 3rd line, while ‘C’ Coy. remained in its original position. Lt. [temp. Capt.] L. A. BLACKETT was unfortunately hit by fragments from a bomb, which had been exploded by a shell, while waiting in the front line to lead his company in the attack. The command of ‘C’ Coy was taken over by 2nd Lt. LEE. At 4.45 pm. the guns opened with an intense barrage and at the same moment our men went over the parapet. The assault delivered with much dash, was entirely successful on the left. Here ‘C’ Coy. carried their objective without any great effort or much loss. On the right ‘D’ Coy was held up by MG fire and the two platoons of ‘B’ Coy. who were to support them on the right were also stopped – Lt. MUNRO, commanding ‘B’ Coy. organized a fresh attack by orders of the Commanding Officer – Stokes Mortars and Lewis gun fire subdued the enemy’s resistance and on the threat of assault he surrendered. The remains of ‘D’ Coy. and half ‘B’ Coy. then carried their objective and joined touch with the 5th Kings Liverpool Regiment on their right, and with ‘C’ Coy. on their left. ‘C’ Company, at the same time was in touch with the 2nd Royal Sussex so that the whole line then stood firmly in WOOD LANE.”

Recuperating from his injuries incurred on the 9th September and whilst on leave, Baillie returned to Inverness in Scotland where his mother now resided at Naverton, Drummond Road.  On Boxing Day of 1916, he married his mother’s neighbour – Isabella Mary Fraser at her Moorlands, Drummond Road residence.  A witness to the marriage was Baillie’s barrister brother John, who was now a Lieutenant with the 44th New Brunswick Battalion, Canadian Expeditionary Force.  Sadly John was killed in action at Vimy Ridge, France on 10th April, 1917.  The Commonwealth War Graves Commission records indicate that John was buried at La Chaudiere Military Cemetery, Vimy. 

IMAGE RIGHT:  Extract from the Record of Marriages for 1916 in the County of Inverness, showing the marriage of Baillie Chisholm MUNRO to Isabella “Ella” Mary FRASER.  Of note is the fact that Baillie actually records the initials ‘M.C.’ after his title.  This would end up another of those tragic ‘wartime’ romances which brings to mind the lyrics from the Eric Bogle song -Green Fields Of France …….”Did you leave there a wife, or a sweetheart behind – in some faithful heart – is your memory enshrined.  Although you died back, in 1916 – in that faithful heart – are you forever 19? …….” 

IMAGE RIGHT:  The Campaign card for Baillie Chisholm MUNRO showing the award of the 1914-1915 Star, British War Medal and Victory Medal.  Strangely there is no mention of Baillie being awarded the Military Cross on this document. 

IMAGE ABOVE: Record card, indicating that Baillie was awarded the Military Cross and ‘Mentioned In Dispatches’.

 That Baillie should play such an active role at the Somme and survive was no mean feat.  However his good fortune on the battlefields finally deserted him at the Battle of Nieuport Bains in Flanders on 10 July, 1917. The Germans referred to the battle as Operation Strandfest, which translates to “beach party”, but it was no party for the Kings Royal Rifle Corps and the 1st Northamptonshire Regiment. The following article from “The Long. Long Trail” web site gives an excellent account of the battle, and is reproduced here with the kind permission of it’s author, Robert DUNLOP:

“On the 20 June, the British XV Corps took over the French sector on the Belgian coast. The Marines Korps Flandern patrols detected the changeover on the 21st.  Korps commander von Schroeder correctly interpreted this report as the prelude to a British attack along the coast.  He began planning Operation Strandfest, a pre-emptive strike to eliminate the Yser bridgehead.  Meanwhile, the British set about improving the defences in the bridgehead.  Tunnellers were used, including the 257th and the 2nd Australian Tunnelling Companies, but their work was not complete when Operation Strandfest began.  Nor was all the British artillery in place; only 176 of the planned 583 guns and howitzers were available to defend the bridgehead.  On the 6 July 1917, the MarinesKorps Flandern began a desultory artillery bombardment, which continued for the next three days.  Fog and low cloud prevented detection of the German build-up. Then, at 5.30am on the the 10 July the massed German artillery, including three 24cm naval guns in shore batteries and 58 artillery batteries (planned naval gunfire support from destroyers and torpedo-boats was cancelled), opened up on the British positions in the bridgehead. Mustard gas (Yellow Cross) was used for the first time in the barrage.  All but one of the bridges over the Yser River were demolished, isolating the 1/Northamptonshire and 2/KRRC of 2nd Brigade, 1st Division on the extreme left flank.  Telephone communication was also cut.  The German bombardment continued throughout the day.  The British artillery attempted a counter-barrage but several guns were knocked out and the German infantry were well protected.  At 8pm, the Marines Korps launched the infantry assault, by which time the two British battalions had suffered 70-80% casualties.  The German stormtroopers attacked down the coast, outflanking the British.  Their attack was then followed by waves of German Marines, supported by flamethrower teams to mop up dugouts.  After a gallant defence, the British battalions were overwhelmed.  Only 4 officers and 64 other ranks managed to reach the west bank of the Yser”.

IMAGE RIGHT:  Map of Operation Strandfest, dated the 10th of July, 1917.  (Image courtesy of members of The Great War Forum)

Robert DUNLOP continues:- “The German attack on the 32nd Division, further to the east, was less successful.  Only the 97th Brigade was attacked and although there was some penetration into the line, a counterattack that night by the 11/Border Regiment, supported by two companies of the 17/Highland Light Infantry, restored all but 500 yards of the front line.  A general counterattack was ordered for the 11 July by General RAWLINSON.  Wisely, he later rescinded his decision at the request of XV Corps Commander, Lt. General John Du CANE.  The total British casualties amounted to approximately 3,126 of all ranks, killed, wounded and missing.  Of these, fifty officers and 1,253 other ranks belonged to the two battalions of 1st Division.  Lieutenant Colonel Richard ABADIE DSO, Officer Commanding 2/KRRC, has no known grave and is commemorated on the Nieuport Memorial to the Missing.”

 British troops held the territory west of the Yser, and on the eastern bank occupied a front line of some 1400 yards stretching from the North Sea towards Nieuport, that was approximately 600 yards wide at the river mouth. The British Army had taken this Nieuport Bains east bank sector over from the French in June 1917, and had access to it via four temporary bridges. The 2nd Battalion of the Kings Royal Rifle Corps, and the 1st Battalion, the Northamptonshire Regiment, defended the front line equally, or 700 yards each in round figures, with the Kings Royal Rifle Corps holding the dune sector against the North Sea, and the 1st Northamptonshire Regiment controlling the adjoining sector towards Nieuport. The following War Diary extracts detail the exact positions of the Kings Royal Rifle Corps Companies on 10 July, 1917. Note that these extracts and others that follow are protected by Crown Copyright, and as such may not be reproduced for profit without permission. For those interested, complete War Diaries can be downloaded from the National Archives for very reasonable prices by clicking here.

IMAGE LEFT: Captain Humphrey BUTLER’s official report has been re-written and edited by his superior officers and part of the final version is reproduced here.  In this report, Captain BUTLER describes the positions of the companies attached to the King’s Royal Rifles on the 10th of July, 1917.  Handwritten notes on the report are those of Lt. Gen. Sir Henry RAWLINSON and it is interesting to note his comment that the K.R.R.C had already been four times decimated since the beginning of the war.

Lieutenant MUNRO and “B” Company were stationed furthest to the right of the three Kings Royal Rifle Corps Companies, so that would locate them roughly 600 yards from the North Sea but still on the dunes, and 600 yards east of the Yser River. Using the above map as a reference, they would be on the British front line as indicated in red, and towards the right hand extremity of the dunes. The British, as did the French before them, found the dunes to be extremely difficult to defend – in the words of Captain Humphrey BUTLER, Adjutant, 2nd. Bn. K.R.R.C.:
“The trenches taken over from the French were of a somewhat sketchy nature, and indeed in the absence of concrete it was difficult for them to be anything else. As a protection they were most imperfect. It was obvious to the veriest tyro that the most unremitting vigilance, the support of the most powerful artillery fire, the closest co-operation between the naval and military forces were essential if the position were to be tenable even for only a few hours. The orders, given to the Battalion Commanders were to hold on to the last; a strong support being thus virtually promised. The French, and before them the Belgians, aware of the weakness of the post, had been most careful to do nothing that could attract attention or raise an alarm on the part of the enemy. Our Battalion Commanders were given to understand that for similar reasons and in view of impending operations they were to keep equally quiet. But in direct contradiction of these general instructions, they were ordered to make raids upon the enemy’s entrenchments, and to these contradictory orders the subsequent tragedy may probably be traced.”

IMAGE RIGHT:  Photographic image of the improvised British shelters on the Yser east bank, 1917.

Captain BUTLER was understandably upset, as casualties included 17 out of 20 officers and 481 out of 520 other ranks. Communication was a contentious issue, as was lack of support, with promised air support being absent for the entire day, and of the 176 guns and howitzers in place none were registered on the German front line. Captain Butler was advised that winds off the coast were light, and felt that their Naval Commanders should have taken the initiative rather than wait for explicit orders, but according to comments made by Lieutenant-General Sir Henry RAWLINSON, they were not in a position to act as winds were in fact strong, and ships would have been lost to superior German vessels and long range artillery on the shore line. The Germans also reported high winds, and were unable to use their Naval artillery against the British.

The following War Diary extract from correspondence between Captain Humphrey BUTLER and his father, Lt.-Col. Lewis BUTLER, tells us how Lt. Baillee Chisholm MUNRO met his fate.:

IMAGE LEFT: Extract from a private report of Captain Humphrey BUTLER (Adjutant 2nd Battalion K.R.R.C) to his father, Lt. Col. Lewis BUTLER. 


 IMAGE RIGHT:  This report is confirmed by the official report that has 2nd Lt. Taylor relating basically the same news shortly after mid-day on 10 July.

Captain BUTLER laid blame for the defeat squarely on the shoulders of his Corps Commander saying “The whole episode demands a most searching enquiry. It is difficult to avoid the inference that the Corps Commander, failing to appreciate the importance of the position and it’s imminent peril, neglected the measures essential for co-operation and support.” The Captain’s “official” report is not the original version, and some apparent inconsistencies may have resulted from editing that took place in attempts to soften criticism of his superiors. One such inconsistency lies in determining the approximate time at which  the Battalion Commander had knowledge of the loss of “B” Company H.Q. The “official” report above, times 2nd Lieut.Taylor’s arrival at Battalion H.Q. as shortly after Lieut. Gott had left on his noon mission and returned, leaving the impression that this was the first information they had received on the fate of “B” Company and Lieutenant MUNRO, as there was no prior mention in the report, but the 1st Northamptonshire war diaries place a different time frame on events:

IMAGE LEFT:  Officer commanding, Lt. Col. Richard ABADIE of the K.R.R.C reporting to the commander of the 1st Northamptonshire Regiment that right company H.Q, being ‘B’ Company, was blown in at 11.07am. This information is inconsistent with the K.R.R.C official report. 

Officer Commanding, Lieutenant Colonel ABADIE, who died valiantly later that same day, informed the 1st Northamptonshire Regiment that Kings Royal Rifle Corps Right Company H.Q. had been blown in, and sent the message by pigeon at 11.07 a.m. Lieut.-Col.Abadie had eight pigeons, and found it necessary to use them as the Fuller ‘phone wires had been cut at 9.50 a.m., and no-one was responding to a buried telephone wire extending to the west bank. Lieut.-Gen.Sir Henry Rawlinson commented that all pigeons “seemed” to have reached their destinations.  It was inconceivable that Lieutenant Colonel ABADIE would not have dispatched one or more birds to his own Corps Commander at that time. The Corps Commander, given better communications may have made different decisions, but ordering the Kings Royal Rifle Corps to conduct raids against a superior force from trenches that offered no protection, and with no support from air, land or sea, was folly. Many good men were lost that day, with one being Lieutenant Baillie Chisholm MUNRO M.C.

IMAGE RIGHT:  A graphic photo of British casualties on the dunes, circa 10th of July, 1917.  Could Baillie Chisholm MUNRO be amongst the dead, pictured here? (Image courtesy of members of The Great War Forum).

Captain Humphrey Butler’s report was most damning of Corps Commander du Cane, the very person with whom he would have discussed the contents before it reached the desk of Lieutenant General Sir Henry RAWLINSON, so one wonders what editing may have been done at this stage.  John Philip du CANE was commissioned into the Royal Artillery in 1884 and served in the Second Boer War before becoming Commander of the 15th Corps in 1916. He rose to become General Officer Commanding-in-Chief for the British Army of the Rhine, and finally Governor and Commander-in-Chief of Malta, so Captain Butler’s report certainly did him no harm. The last four pages of Captain Butler’s report have been reproduced here, and once again the hand-written comments are those of Lieut.-Gen.Sir Henry RAWLINSON:

IMAGE LEFT: Page 16 of Captain BUTLER’s official 19 page report.  The handwritten notes are those of Lieutenant General Sir Henry RAWLINSON.

Captain BUTLER is critical of the orders to commence raids, to which Lt. Gen. RAWLINSON has replied “the position was taken up at a time when the corps artillery most wanted direction, could not be used in support”.  RAWLINSON’s notation in pencil at the bottom of page 16 confirms the number killed as 7 with 10 prisoners of whom 5 were wounded. 


IMAGE RIGHT:  Page 17 of Captain BUTLER’s official report. 

Lieutenant General RAWLINSON agrees that support and communication were impossible after the bridges were gone, but contradicts himself on the same page where he says that a buried telephone line was constantly in use as far as the left bank.  Why did Lieutenant Colonel ABADIE need to resort to the use of carrier pigeons if this line was intact?  Strangely RAWLINSON does not respond to BUTLER’s claim that the Corps Commander may have been absent on duty. 


IMAGE LEFT:  Page 18 of Captain BUTLER’s official report.

Captain BUTLER was disgusted by the insensitivity displayed by Corps Commander du CANE when addressing the surviving officers of his King’s Royal Rifle Corps.  BUTLER blamed du CANE for the disastrous consequences, yet du CANE had the nerve to attribute ‘no blame’ to his officers on account of the ground lost when he should have been praising their efforts.  Captain BUTLER was also speaking on behalf of the Northamptonshire Regiment, of whom no officers survived and accordingly, no member of this regiment was present for this insulting address. 

IMAGE RIGHT:  Page 19 and final page of Captain BUTLER’s offical report.

Lieutenant General RAWLINSON comments here that Captain BUTLER had been “unreasonably venomous” in respect of du CANE’s behaviour and the lack of naval support. The wind was in fact  off the shore, as RAWLINSON notes here, and he comments further “you forget that there are between 20 & 30 German quick firing coast defense guns that command any position from which the ships can fire”.

Right or wrong Captain Butler should be applauded for stating the facts as he saw them in what could not be considered a good career move. Corps Commander du CANE was experienced and should have known better. From a military point of view it would have been advantageous to control the Yser river mouth, but the topography was such that the position could never be suitably fortified or defended. The French and the Belgians knew that, as did the Germans, who rather than place themselves in harm’s way were able to control the dunes from the air, sea and with their artillery. Little wonder that Captain Butler took issue with Corps Commander du Cane for conducting raids from the dunes and costing so many men their lives.

Baillie Chisholm Munro’s name appears on the Nieuport Memorial as one of 548 officers and men of United Kingdom forces who died during the First World War in operations on the Belgian Coast, and whose graves are not known. 

The war service medals awarded to Baillie include the Military Cross which was awarded in 1916. The 1914-1915 Star and Clasp, the British War and the Victory medal – were all awarded posthumously in 1920 following applications by his widow Isabella.  Her daughter, Minna Baillie Chisholm Munro, who was born in 1917 after her father had perished, became Dr Minna Baillie Chisholm MUNRO M.B., Ch.B.   She would marry Mr. Alexander Henderson at Edinburgh in 1942; and according to the 1959 United Kingdom Medical Register, was living at North Park Road, Bradford.  Minna of course never met her father, but must have been immensely proud of him.

IMAGE LEFT:  The Military Cross, 1914-1915 Star, British War Medal and Victory Medal as awarded to Baillie Chisholm MUNRO.

This story was composed by Mr. Paul MUNRO who states that he is a distant cousin of Baillie Chisholm MUNRO.  He would like to thank the National Archives, Ancestry.com, the website ‘The Long Long Trail’ and ‘The Great War Forum’.   Paul MUNRO from Australia is researching Baillie Chisholm MUNRO’s family tree and would keenly like to make contact with other relatives of Baillie.  Paul can be contacted on email:-  

ADMINISTRATOR’S NOTE:  A British War Medal sold on the open market on the 12th of April, 2008.  The identity of the seller and the purchaser are not known.  This medal was inscribed on the rim with the recipient’s name; however it is evident that the medal was well ‘worn’ and as a result, the inscription is not clear.  The war medal may have borne the name “B.C. MUNRO” or “R.G. MUNRO”.  As can be seen, if the first two initials were subject to wear, it would be difficult to distinguish between the two.  Mr. Paul Munro has asked that if the current owner of the British War Medal reads this story, could he please contact him through the Medals Gone Missing website.  Alternatively, if you know of the whereabouts of Baillie’s other war service medals ….. or you are a relative of Baillie Chisholm MUNRO, could you also please make contact.

  • Delicious
  • Facebook
  • Digg
  • Reddit
  • StumbleUpon
  • Twitter
Posted in Honour Roll - British Stories, Military Medals | Tagged | Leave a comment